Friday, January 15, 2016

Blood Orange Panna Cotta

Panna cotta is not a new dessert but it's something I wasn't exposed to until a few years ago.  I just love it!  I often order it at restaurants as it's such a light dessert, a little sweet.  It's so refreshing after a big meal. Last month we were in the Napa Valley and had a late lunch at my favorite restaurant there, Bottega. One of their dessert offerings that day was a blood orange panna cotta. It was heavenly! My mission became to recreate that for home.

My favorite panna cotta recipe is from Ina Garten so I tweaked it, using blood orange juice instead of water, to soften the gelatin. This gave the panna cotta a slight pink color.  Then I made a juice reduction to pour over before serving. I thought it turned out wonderful! My dinner guests this evening had never had panna cotta and enjoyed it.
Winter is citrus fruit time, everywhere I go I see oranges, grapefruits, lemons hanging on the trees.  Blood oranges have a crimson flesh.  They have a different taste from regular oranges, almost a raspberry-like addition to the citrus flavor. I love blood oranges and have used them to make marmalade, cakes, and add them to baked chicken dishes. And now I know to use them for panna cotta!

Panna cotta is a very easy dessert to make.  It also is a make-ahead dessert, leaving more time for dinner preparation and enjoying guests!

Blood Orange Panna Cotta

3 tablespoons freshly squeezed blood orange juice
2 teaspoons (1 packet) unflavored gelatin powder (Knox)
3 cups heavy cream
2 cups plain whole-milk yogurt
1 1/2 teaspoons pure vanilla extract
1 vanilla bean
3/4 cup sugar

In a small bowl, sprinkle the gelatin on the 3 tablespoons of blood orange juice.  Stir and set aside for 10 minutes to allow the gelatin to dissolve.

Meanwhile, in a medium bowl, whisk together 1 1/2 cups of the cream, the yogurt, and vanilla extract.  Split the vanilla bean and use the tip of a knife to scrape the seeds into the cream.  Heat the remaining 1 1/2 cups of cream and the sugar in a small saucepan and bring to a simmer over medium heat. Off the heat, add the softened gelatin to the hot cream and stir to dissolve.  Pour the hot cream-gelatin mixture into the cold cream-yogurt mixture and stir to combine. Pour into 8 (6- to 8- ounce) ramekins or custard cups and refrigerate uncovered until cold. When the panna cottas are thoroughly chilled, cover with plastic wrap and refrigerate overnight.

Blood Orange Syrup

1 blood orange, zested, pith removed, cut into segments
1/4 cup freshly squeezed blood orange juice
1/3 cup sugar

In a small saucepan, combine the zest, juice and sugar; bring to a simmer. Cook until sugar is dissolved and mixture has a syrupy consistency, about 4 minutes.  Cool and refrigerate in a covered container.

To serve, carefully run a paring knife around edge of each ramekin.  Turn upside down onto a plate (shake if it doesn't immediately fall out).  Place an orange segment on top and drizzle with blood orange syrup.

Saturday, January 9, 2016

A Mickey Mouse First Birthday Party!

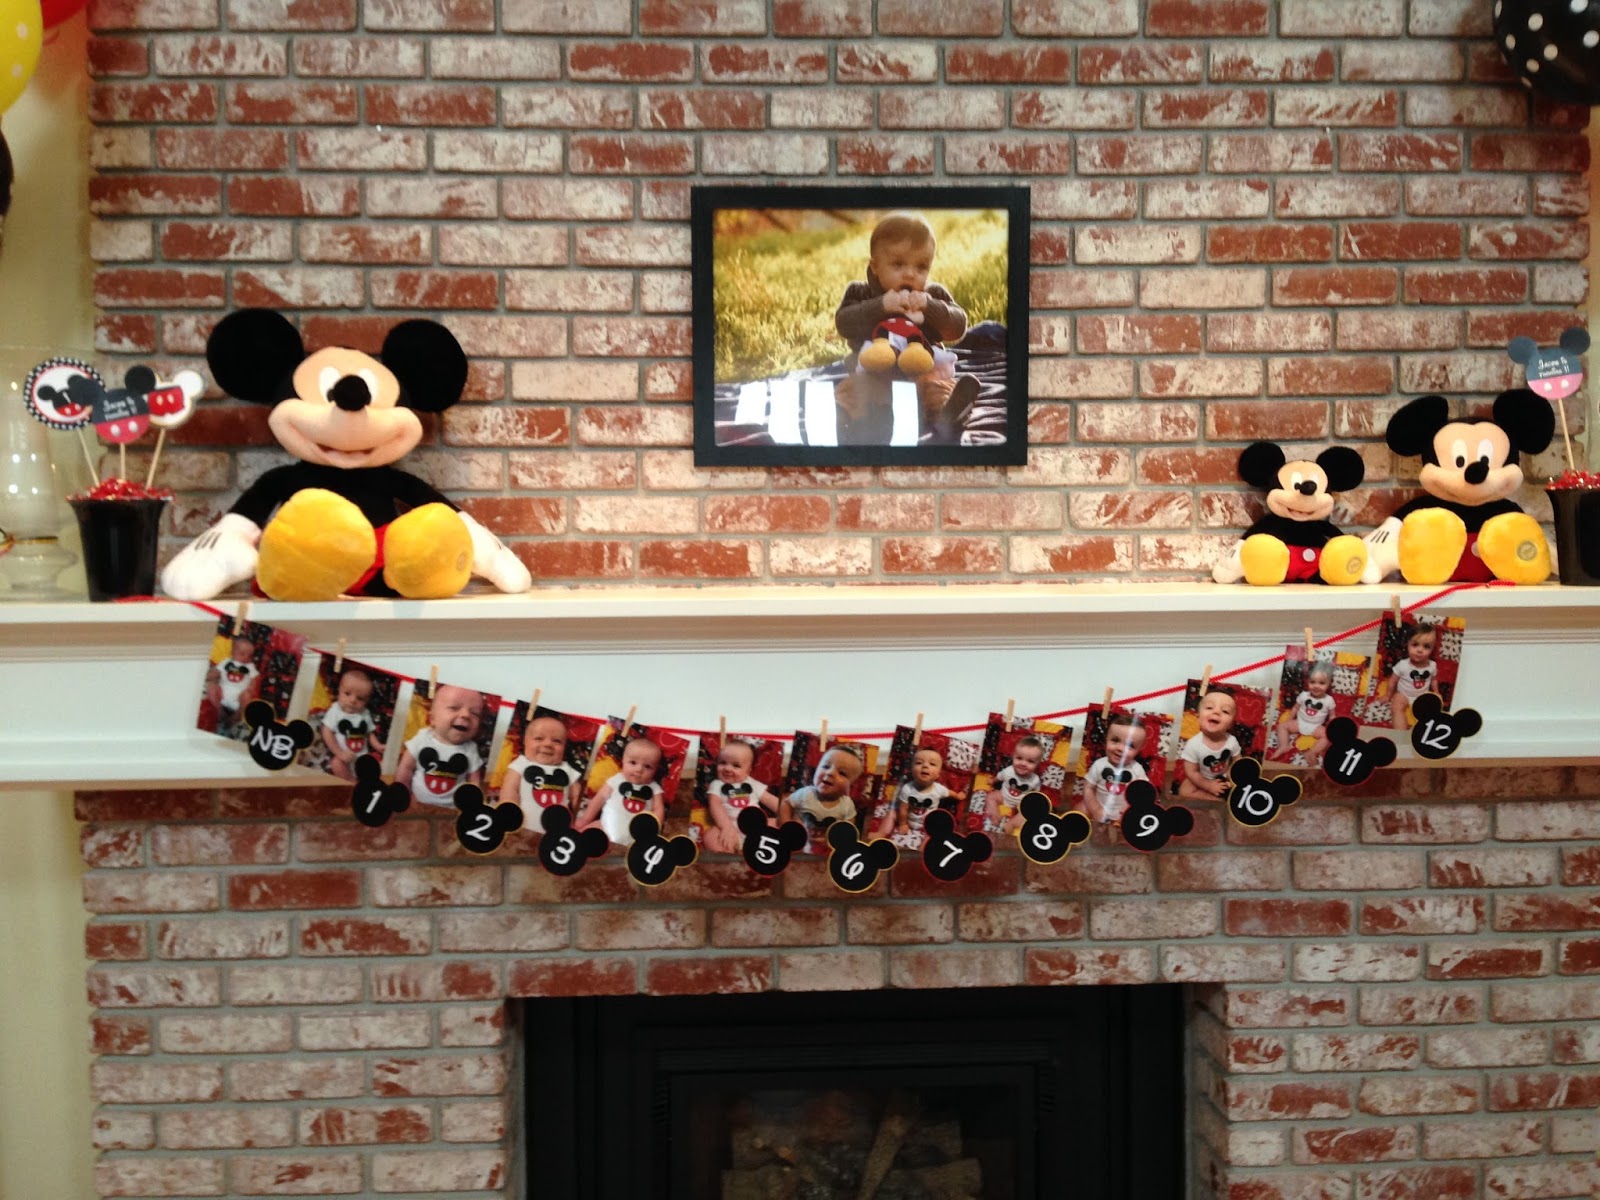
My daughter-in-love is a big Disney fan.  When she was pregnant she was given a Mickey Mouse-themed baby shower by her friends.  I made a Mickey rag quilt and Mickey labels that were used to chronicle each month of our grandson's first year. It was only natural that his first birthday party have a Mickey Mouse theme, too!
I saw a cake stand, similar to this, online over a year ago.  I looked everywhere for the source and couldn't find one.  My daughter-in-love's father is a great woodworker so I enlisted him to make this for me.  I suspect we will use it for many future gatherings and loan it out.  It is so cute and was the perfect centerpiece for the birthday cake!
I made the sugar cookies.  As I had eye surgery on the day I was doing cookies I knew I couldn't do the normal royal icing decorated ones, so sugar crystals had to do!
The party was in our home but our daughter-in-love did everything else; the cupcakes, Rice Kripies treats, candy coated pretzel sticks, popcorn, putting together the banners, table centerpieces, etc. She did a great job!


My favorite part was this display of our grandson's first year, wearing a white onesie and his month labels, sitting on his Mickey quilt.  Seeing the transition from a newborn to a one-year old just melts your heart!
The birthday boy got his first taste of sugar, he was very tentative about it, but enjoyed it. Happy first birthday, sweet Jakey!

Wednesday, January 6, 2016

Mix 'n Match Table Setting

Having a plethora of dishes and linens allows me to create different table settings from the same rotating stock of supplies. Or so I tell myself. I do try to get things that can be interchangeable, it helps me justify my collecting habit. That's my story and I'm sticking to it!
We entertained another couple for New Year's Eve.  The Christmas flowers were still looking pretty good so I wanted to coordinate the table around their red and white color.  I grabbed my recently acquired red plates that are from the Pioneer Woman's line at Wal Mart. I'm not ashamed to say I shop at Wal Mart!

The blue crocheted place mats, acquired last spring, brought out the blue in the salad plates (also Pioneer Woman). And last summer, while in Cambria, I spotted these April Cornell napkins and knew I'd use them sometime.  They were almost an identical match to the plates!
We had been having sunny days in California (we are now inundated with El Nino rainstorms!) and we had birds all over the backyard. So, a few birds on the dining table seemed fitting!
I think the red plates, blue placemats and a white salad plate will be fitting around the Fourth of July. My hubby will think I bought new dishes (again).  I can show him these pics as proof that I do use my dishes more than once!


Saturday, January 2, 2016

Shrimp and Roasted Garlic Tamales

Last month we were able to get away to Las Vegas for a few days to see Brooks & Dunn and Reba in concert at Caesar's Palace. That gave me the opportunity to make reservations at a few celebrity chef restaurants.  One night we had dinner at Giada and the other night we ate at Bobby's Flay's Mesa Grill.  We had eaten at Mesa Grill once before and thoroughly enjoyed it.  The second time didn't disappoint us either.  For an appetizer we each had the shrimp and roasted garlic tamale. We enjoyed it so much we went back the next afternoon to have a margarita and share the appetizer (their margaritas are amazing, too! ) At that point I knew I wanted to try these at home so bought his cookbook.
We had another couple over for New Year's Eve so these were on our menu. They were good, very good, but not as spicy as I remembered the ones we had at the restaurant.  Next time I will add some chilies or red pepper to jazz them up some.

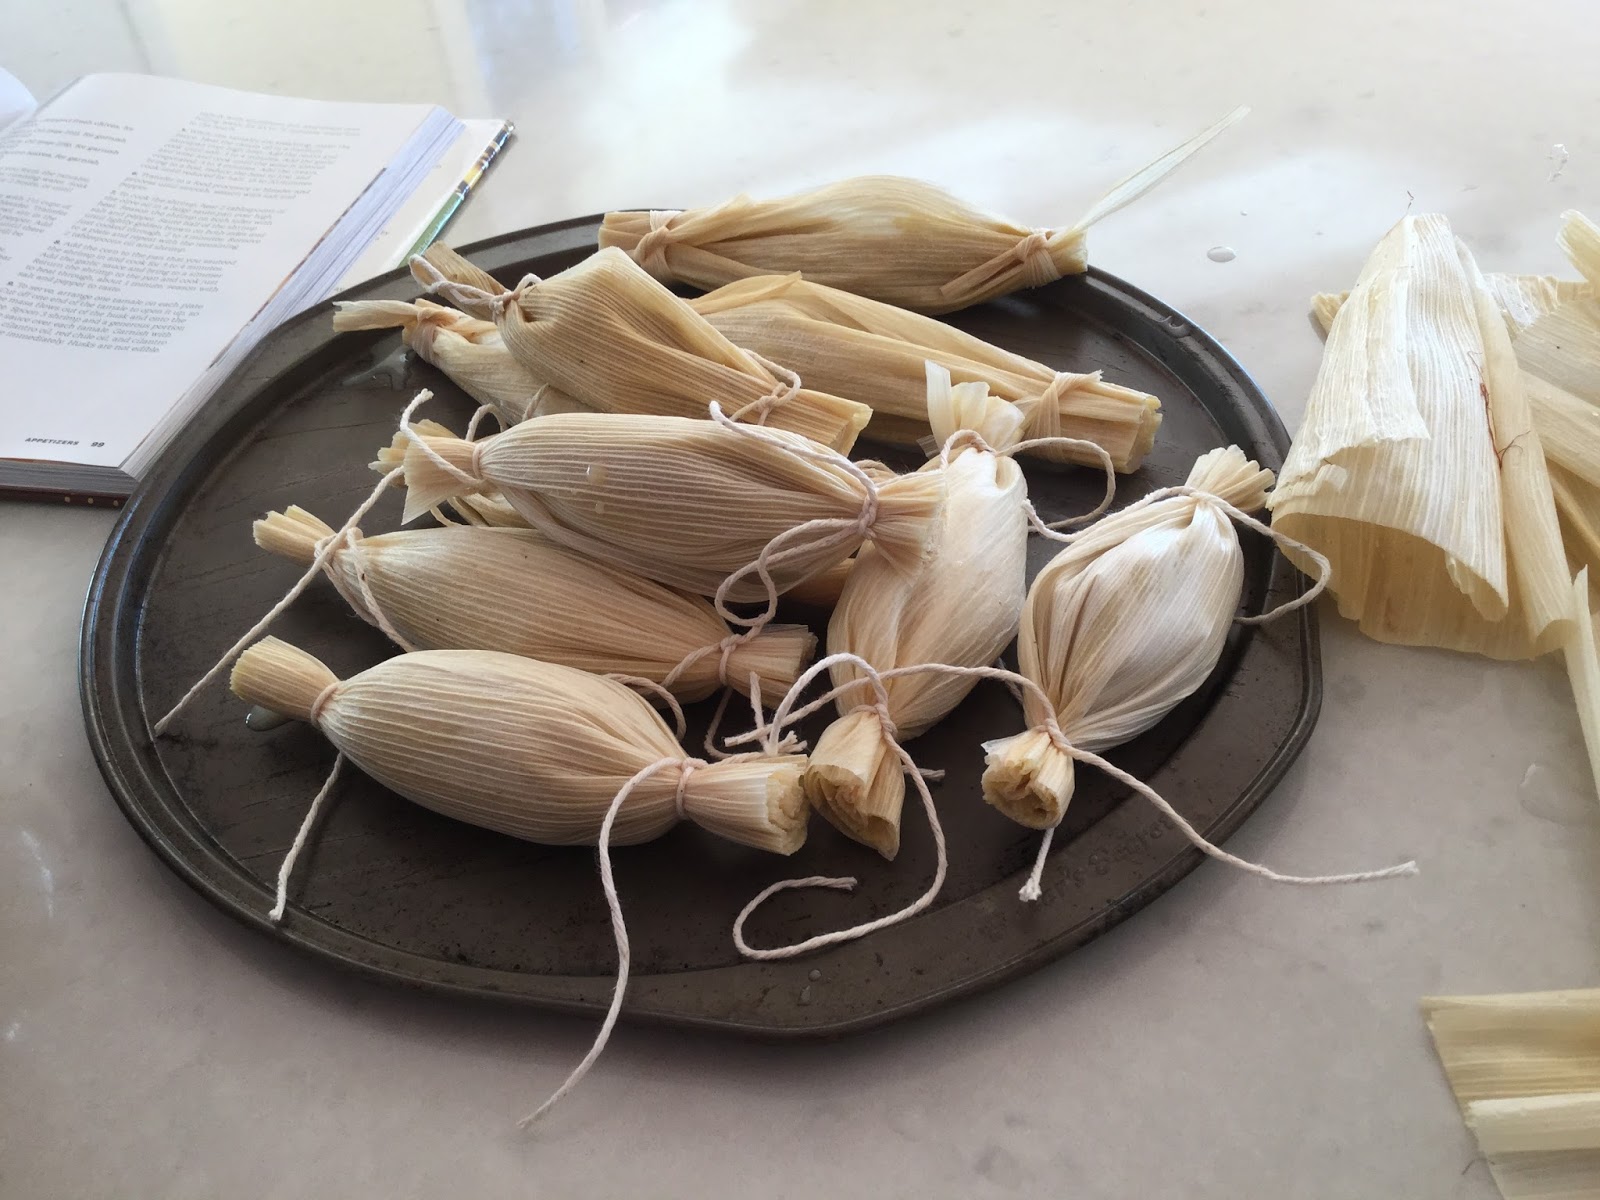
This was my first attempt at making any sort of tamale.  The filling is a soft filling, when you open the corn husk after baking it loosely spreads out. Traditional tamales have very firm masa fillings. These weren't hard to make, just took time and a lot of dishes! But I had all afternoon so did it in steps.  The next time I make them it will be when we are entertaining more people.  It was a lot of work for just the four of us! 

Here is the recipe .  Don't be intimidated by its length, many of the steps can be done ahead of time.

The part I had a hard time with was tying up the ends of the tamales.  The recipe calls for using strips of the corn husks.  Most of mine would break as I went to tie them.  So I grabbed my ball of twine and used that instead. Maybe not as pretty and authentic but this was better than the tamales falling apart!
The tamales have a loose, corn and cornmeal filling.

Ready to be steamed.

Wednesday, December 30, 2015

2015 In Review

I'm sure I'm not the only one who feels the years are passing faster. The older I get the more it seems time is zipping by! I'm cognizant that I have more years behind me than ahead of me and feel somewhat desperate that I can't slow things down. I just have to try to concentrate on the "now" and cherish every moment and memory. It's amazing to look back and see all I experienced, accomplished and learned in 2015!

January:

January found us welcoming our fourth grandchild, and only grandson, to our family. I was able to spend almost a week with the new family assisting in any way I could.  A lot of time was spent in the kitchen, including baking these banana cinnamon rolls.
Later that month I hosted my family's 9th annual tea with a "Let It Snow" theme.  Our 10th gathering is coming up soon!

February:

Every February finds me transitioning from being a part-time CPA to working seven days a week. Dinners are minimal, very little sewing or crafting gets done. But I always try to prepare a nice Valentine's dinner for my Hubby, including setting a nice table. I plan ahead and make sure to have small gifts for my grandchildren. It's important to include all my loves for this holiday!

March:

March finds our gardens coming alive and the almond orchards in full bloom.  Vital to all this are honeybees. This cake, resembling a beehive, was fun to bake.
April:

Finally, April 15 arrived and I had free time again!  One of my favorite pastimes is spending time in the kitchen, with my youngest granddaughter, baking family favorites. These cookies never fail to please!
May:

Once again I hosted a Mother's Day luncheon for the women in my family. I used some new linens to set a colorful garden-themed table.

June:

The warm days of June found me in the backyard quite a bit, planting new plants and tending to the old. Animal water troughs became my solution to a root-infested (from the neighbor's trees!) area of our yard.
July:

In July I was able to check off an item on my household projects to-do list; painting a side gate red and curving the top of it.  We get so many compliments on this gate and it was so easy to do!
August:

I had been coveting an old wheelbarrow for a long time. Imagine my surprise when I found out my parents had one in their garage! It now resides in my flower bed!
September:

Late September found me, once again, knee-deep in gingerbread in anticipation of my annual Halloween gingerbread house decorating day with my grandchildren.  I absolutely love this day, the interaction with the girls, observing how their decorating skills improve from the year before.
October:

I love antiques and it's said that the best antiques are old friends.  I so agree!  Three of my high school girlfriends and I were able to gather in San Francisco for a weekend.  While there we attended a gnocchi cooking class.  It was a blast and I've been experimenting with gnocchi ever since.  We are currently planning a 2016 getaway to the Sonoma Valley.
November:

November found me venturing into quilt-making.  It's going slow, I only have four blocks done, but I can tell I am improving with each block that I do. A person is never too old to learn and I'm enjoying the process. 
December:

I finally found an old dresser that I liked for my craft room.  Taking a day off from Christmas preparations I painted it, using chalk paint for the first time. I now have two more projects waiting in the wings!
Thank you for visiting my blog this year and sharing in my crazy domestic ventures. Who knows what's in store for 2016!


Monday, December 28, 2015

Popovers!

We had family celebrations on Christmas Eve and December 26 so Christmas Day found my Hubbers and I alone for dinner.  I cooked a small prime rib and a few sides, a very low-key and easy dinner. I also made a batch of popovers.  I've made them before but it was obviously a while ago because my Hubbers didn't remember ever having them.  Now that he remembers he wants them again, and soon! I think a batch will accompany our soup dinner tonight!
Popovers are a light, hollow roll that "popover" the tops of the pan. A special-purpose popover pan is ideal for these as the sides are straighter and cause the rolls to rise over the top.  Muffin pans can be used, they just won't rise as high. 

They are very easy to make, one bowl and a whisk does the trick.  The key to making good popovers is warming up the pan before putting the batter in.  Then, no opening of the oven while they are baking! Once baked they should immediately be removed from the pan and put on a wire rack so they don't lose their crunch. In addition, poking a small opening in the popover lets the steam escape.
I made plain popovers on this evening, but they can be sweet or savory depending on what you add to them.  Cheese, herbs, chocolate, or small bits of meat or fruit are all great additions.  Of course, butter and jam or jelly always work!

Popovers

3 large eggs, room temperature
1 1/2 cups whole milk, room temperature
1 1/2 cups flour
1 1/4 teaspoons slat

Put a nonstick popover pan on oven rack in lowest position, preheat oven to 450 degrees.

Combine flour and salt in a small bowl, set aside.

Combine the eggs and milk in a large bowl, whisk together until very frothy, about one minute.  Add the flour mixture and whisk until the batter is the consistency of heavy cream with some small lumps remaining. (Don't be afraid of the air bubbles, they help the popovers to rise!)

Remove heated popover pan from oven and spray with baking spray.  Fill popover cups about three-quarters full with batter. Bake 20 minutes, then reduce oven temperature to 350 degrees.  Continue to bake until golden brown and dry to the touch, about 20 minutes.

Immediately remove popovers to wire rack and poke a small opening in the side of each with a paring knife.  Serve right away.

Wednesday, December 23, 2015

Merry Christmas!

The shopping and wrapping are done, as is the decorating, the groceries have been shopped for.  Now it's time to cook, bake and cherish the moments spent with our family! I've been enjoying our home the last few days; the glow of the Christmas tree lights, my favorite ornaments hanging on the tree, the Nutcrackers standing at attention on our mantle, the Nativity set reminding me of what Christmas is all about.  Christmas music has been on every minute we're home (and in the car, too!) In a few days everything will be packed away for another year, I'm trying to enjoy every minute of the Christmas frivolity that I can.
We all have our favorite Christmas mementos, songs, and decorations, most of which revolve around special memories.  Such is the case with these little cardboard gnomes and figurines.  My Mom bought a set of these gnomes (she thinks at J C Penney) in the 1960's.  They are made of cardboard, and decorated with glitter, chenille, tinsel and small decorations. Little Santas, angels, gnomes, snowmen, they are only about 3 inches high. Every year she would make a house out of Rice Krispies, similar to a gingerbread house.  These little gnomes would surround the house.  I remember playing with them on so many occasions.  A few years ago Mom gave them to me.  She wasn't sure if I would want them or not, many are tattered and broke. A few are missing their base and have to be displayed in a glass. I jumped at the chance to have them! They, of all the Christmas decorations I have, remind me the most of my childhood. 


 They are too fragile to be kept on a tabletop so I display them each year in my china cabinet. Each time I see them I recall Mom making the little cereal houses and how we would help to decorate them. I remember very few gifts I received during my childhood but the memories of these little gnomes have stayed with me. Thanks, Mom, not only for gifting me these little guys, but for all the wonderful Christmas memories you helped to make for your family!
For the next three days we will have family in and out of our home, ranging in age from almost a year to 85. There will be good food, lots of calories, wrapping paper strewn everywhere and more memories made.  We will love every moment! It truly is the most wonderful time of the year.  Merry Christmas!