Sunday, December 31, 2017

2017 in Review

In my 2016 review post I mentioned that I hoped 2017 would be a better year for us as our families had health issues and deaths to get past.  2017 was slightly better, but there were still bumps in the road. Our parents have a multitude of health issues, which involves more and more of our time. My Hubbers had a stroke on July 1, which really knocked us for a loop.  He's had a great recovery and we've found that our life's priorities have changed.  Work isn't as important as it was, we are valuing our leisure time even more than before. Spending time at home, and with our family and friends, has become even more precious.

Reviewing my year's blog posts reinforces that, even with our setbacks, we still have a full and blessed life.  We did a lot of entertaining, I baked a lot of new things (I get bored baking the same things!), I made a lot of sugar cookies and I am progressing with my novice  quilting skills.  Family traditions, such as our annual tea and my granddaughters' gingerbread decorating day, continue on. I keep striving to learn and grow in many areas. I'm looking forward to 2018 and all it will bring.

Here is a little recap of some of my favorite domestic moments during 2017:

January:

We don't go out on New Year's Eve, preferring to avoid the crowds.  Instead, we stay in and I make a nice dinner for us.  This year we ate in front of the fire.  I learned to make patterned plates with mod podge and material.  It was an easy and rewarding craft, I've since made plates for other occasions.


February:

As I did in 2016, I joined an online quilt sew-along.  It was to be a tax season diversion for me. This year's sew-along went at a much faster pace and involved a lot of appliquing.  Due to  my crazy tax season schedule I couldn't keep up the pace and didn't finish the quilt until mid-summer. The quilt is beautiful and I learned a lot in the process.  I have a much simpler project in line for tax season 2018!


March: 

My kitchen is pretty much in a dormant state during March.  We are in the thick of tax season; deadlines and pressure are the norm.  But I miss being in the kitchen.  One day I made an old family favorite recipe, Texas Sheet Cake.  So easy, so good, and my office staff was quite happy with me!


April:

With the end of tax season looming, my appointments getting lighter, I got in the kitchen a little more often.  Bon Appetit said this cake recipe was one of their most popular.  I can see why, it was very light and tender.  I've since made it with other berries and it was just as good!


May:

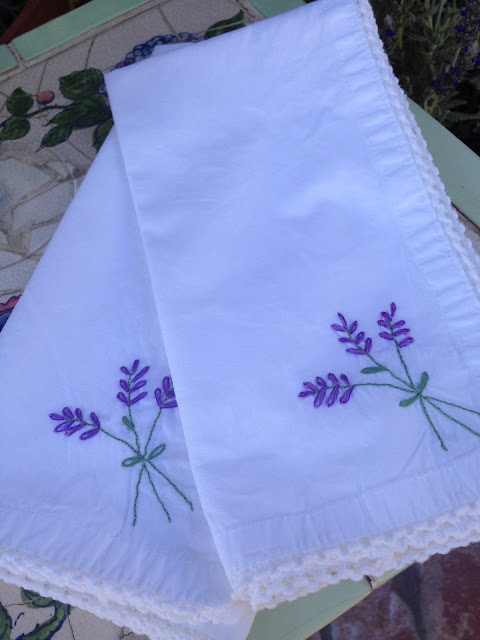
By the time tax season ends, I have a list of projects I want to complete and I often don't know which one to start on first.  I had started these embroidered napkins at the beginning of the year, then they sat for a few months.  Once I got back to them they were easy to finish.  A simple embroidery pattern made for a beautiful set of napkins.


June:

My favorite fruit stand is up and running and boysenberries are in season!  I lost count of how many boysenberry pies and crisps I made.  Boysenberry pie is one of my favorites and this simple recipe can't be beat. I still have some frozen boysenberries in the freezer, I think I need to make a pie!


July:

I did no posting in July.  My Hubbers had a stroke July 1 and the month was spent in the hospital or in and out of doctor's offices. I missed my kitchen a lot during this time period, hospital food is as bad as you hear about!

August:

Most birthday dinners in my family revolve around tacos.  Guacamole is a must-have on taco nights!


September:

September found me hosting several parties; a baby shower for my niece and a 7th birthday party for my granddaughter.  Though tiring, I enjoy the decorating, making cookies and treats for the parties.  I also like when everything is over and I can kick up my feet and relax!


October:

My three granddaughters and I met up one afternoon for our annual Halloween gingerbread house day. This year I played with fondant and made various accessories for the houses.  The girls are getting very good at decorating, have their  own ideas of what they want to do,  and can use a piping bag quite well.  I enjoy this time with them, our giggles and laughter.


November:

I have a cake pan obsession and bought a few this year.  This fall-themed pan is one of my favorites.  This jalapeno cornbread is quite good even if you don't have a fun pan!


December:

We had our 11th annual Christmas Tea the first part of December.  This year we ranged in age from 4 weeks to 93 years old. It's become a cherished tradition.  This year's theme was Peppermint and Roses. 


Thank you for following my domestic pursuits on my little blog this year.  I enjoy your comments and questions. Happy New Year!

Thursday, December 21, 2017

Christmas for the Birds!

Our youngest granddaughter spends almost every Friday evening with us. I pick her up from school and try to make our time together as special as possible.  During the summer months, we do a lot of swimming and bike riding.  In the winter we spend more time in the kitchen or my craft room (which she refers to as "her" arts & craft room!)  I know that time is fleeting and, much too soon, she will be spending Friday nights doing things other than being with her Nana & Papa! 

Ever since she was a toddler she has enjoyed helping me with the garden chores.  We've planted flowers, painted rocks, made birdhouses, she helps to water the plants (at times she got more wet than the flowers!)  She especially likes to feed the birds.  I keep a galvanized container on the back porch, filled with bird seed.  On Saturday mornings she makes it her mission to fill up the various containers in the back yard where the birds feed. I thought she would enjoy making some Christmas bird seed wreaths for the birds so this project occupied our time one recent afternoon.


These wreaths were easy to make and was something that a 7-year old could do with little assistance from an adult. We made them one afternoon and the next morning unmolded them and attached some tulle for hanging. She was thrilled when she spotted the first finch pecking away at one of them! We have a few neighbors that are bird feeders, too, so we bagged up some wreaths and distributed them as gifts. The expression on her face, as the neighbors exclaimed over her gift, was priceless. It truly is better to give than receive!

The bird seed mixture is sticky so we found using waxed paper helped when pressing the mixture into the pan.

Besides being a fun granddaughter-Nana project, these wreaths serve a useful purpose. During the winter months natural food supplies for birds are least available.  Providing a food source for the backyard birds gives them a greater chance of surviving the winter. Well-fed birds in the winter equal happy, chirping birds in the spring!

Bird Seed Wreaths

4 cups bird seed
1/2 cup warm water
1 envelope Knox gelatin
3/4 cup flour
3 tablespoons light corn syrup

Combine the water and gelatin in a large bowl, then whisk in the flour and corn syrup.  Mix in the bird seed.  Press firmly into a lightly greased bundt pan ( used a mini bundt pan).  Let dry for a few hours in the bundt pan then pop them out of the mold so they can dry out completely, approximately 24 hours. Add a length of wide ribbon for hanging (narrow ribbon or twine will tear through the wreath).

Note:  These to not hold up to rain, so place in a covered spot or take down if rain is coming. In dry California that's not a big concern!

Tuesday, December 19, 2017

Homemade Marshmallows

Homemade marshmallows are easy to make and taste fantastic. I was first introduced to homemade marshmallows about 15 years ago when I saw Martha Stewart making them on one of her shows.  I remember thinking “well, that looks easy!” and got busy making some. They have a much lighter texture than store-bought marshmallows, there is really no comparison. They truly are easy to make, your stand mixer does most of the work. (Though they can be made with a hand mixer, they really aren’t powerful enough and you will be mixing forever!)

I like to dip the marshmallows in chocolate to make them a little more special.  On this day I made a simple chocolate ganache.  After dipping the marshmallows in the ganache, I topped them with some chopped peppermint bark. Some became our dessert, some were bagged up for gifts, and some were used for hot mochas (I do confess that my mocha had the addition of some peppermint schnapps. So yummy!)


If you need a last minute Christmas or hostess gift, you should try making these marshmallows!  Instead of cutting them into squares, you can use cookie cutters to make shapes such as snowflakes to make them more festive.

 Homemade Marshmallows

3 packages unflavored gelatin (such as Knox)
1 cup water, divided
1 ½ cups granulated sugar
1 cup light corn syrup
¼ teaspoon kosher salt
1 tablespoon pure vanilla extract

Confectioners’ sugar, for dusting

Combine the gelatin and ½ cup of cold water in the bowl of an electric mixer fitted with the whisk attachment and allow to sit while you make the syrup.

Meanwhile, combine the sugar, corn syrup, salt and the remaining ½ cup water in a small saucepan and cook over medium heat until the sugar dissolves. Raise the heat to high and cook until the syrup reaches 240 degrees on a candy thermometer.  Remove from the heat.

With the mixer on low speed, slowly pour the sugar syrup into the dissolved gelatin. Put the mixer on high speed and whip until the mixture is very thick, about 15 minutes. Add the vanilla and mix thoroughly.

With a sieve, generously dust an 8 by 12-inch nonmetal baking dish with confectioners’ sugar.  Pour the marshmallow mixture into the pan, smooth the top, and dust with more confectioners’ sugar. Allow to stand uncovered overnight until it dries out.
 
A candy thermometer is a must, the sugar water mixture needs to cook until it's up to 240 degrees.

Once the mixture is thick, pour the marshmallow mixture into a pan dusted with confectioners' sugar.
 

Friday, December 15, 2017

Christmas Stovetop Simmer

I’ve been making this stovetop simmer (or stovetop potpourri) for over 20 years now. I got the recipe from a Southern Living cookbook. It’s a spice mixture that simmers on the stove, filling the house with the wonderful spices of Christmas, such as cloves, cinnamon and citrus. It always smells like something heavenly is baking in our home when this mixture is bubbling away on our stovetop!


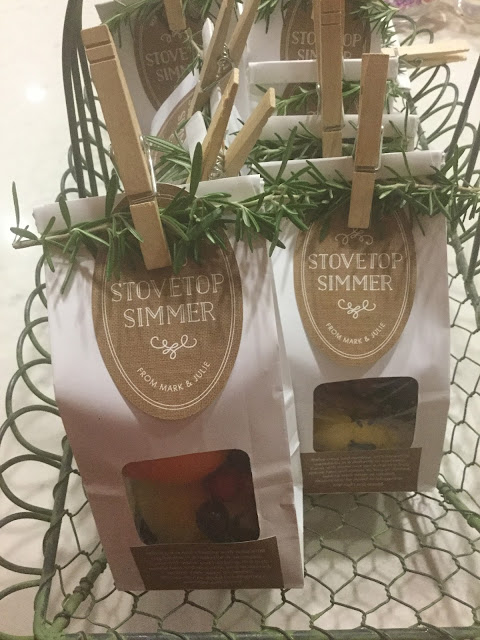
Recently I found a blog article where the simmer mix was bagged up for gifts. Why that never occurred to me is a mystery as I love making homemade gifts! I ordered bags and labels and bought some bulk spices at a local discount store. My 7-year old granddaughter assisted with the assembly of the gift bags, she really enjoyed that. She took home bags for her mommy, grandma and teacher. My bags got passed out to my Pilates classmates, some neighbors and friends. It’s an easy gift, I think this will become an annual tradition! If you make them for gifts, don't forget to attach instructions.  I had a label made that I put on the front of the bag.


Christmas Scent Stovetop Simmer

For one pot:
3 cinnamon sticks
3 bay leaves
1/4 cup whole cloves
1 lemon, halved *
1 large orange, halved or 1 mandarin orange *
1 quart water
Optional: handful fresh cranberries, evergreen or rosemary sprig

Combine all ingredients in a teakettle or saucepan and bring to a boil, reduce heat to a simmer as long as desired. Check often, adding additional water, if needed. Mixture may be stored in refrigerator for several days and reused.

* If packaging for gifts, leave citrus whole.

My bags and labels were purchased from Evermine.

Monday, December 11, 2017

Gingerbread Cupcakes

What is it about the Christmas holidays that make us want to bake and bake? I think the lights on the Christmas tree must send out signals to our brain putting us in the baking mode. I'm seeing lots of social media posts where my friends are baking away so I know I'm not the only one under the spell!
 
It was a gingerbread weekend for me. I spent one evening with my granddaughter decorating gingerbread cookies. I sent her home with most of our masterpieces and found myself craving some by Sunday. So I made some more cookies and these cupcakes. I took most of them over to my parents, my dad has a real sweet tooth.  In fact he said, "you sure know how to make a man happy". Well, I try, dad!

 
 These are full of all the great ingredients that make up gingerbread and are especially spicy with a little extra ginger. I topped them with a basic cream cheese frosting and a small gingerbread cookie cutout.


 I think this weekend satisfied my gingerbread craving.  Now I have peppermint on the brain! This little one and I have a peppermint bark project planned!


Gingerbread Cupcakes
 
2 ¾ C flour
3 T ground ginger
2 t baking soda
1 ½ t ground cinnamon
½ t ground cloves
½ t ground nutmeg
¼ t salt
10 T unsalted butter, at room temperature
1 C packed dark brown sugar
3 large eggs, at room temperature
1 ¼ C molasses
1 C hot water
 
Cream Cheese Frosting:
1/2 cup (1 stick) unsalted butter, softened
2 (8 ounce) packages cream cheese, softened
3 cups powdered sugar
2 teaspoons pure vanilla extract
 
Preheat oven to 350 degrees. Line 2 standard cupcake tins with 24 paper baking cups.
 
Sift together the flour, ginger, baking soda, cinnamon, cloves, nutmeg, and salt; set aside.
 
Cream together the butter and brown sugar in the bowl of a stand mixer (or use a hand-held mixer) on high speed, about 3 minutes, or until light and fluffy.  Add the eggs, one at a time, beating slowly after each addition.  Add the molasses, mixing until well incorporated.
 
Add one third of the dry ingredients and one third of the water and mix thoroughly.  Repeat, stopping to scrape down bowl, as needed.  Add the last third of the dry ingredients and the water and mix thoroughly.
 
Scoop the batter into the cupcake liners (I use an ice cream scoop), filling about 2/3 full.
 
Bake for 16-18 minutes or until an inserted toothpick comes out clean.  Transfer the pan to a wire rack to cool completely.
 
To make the frosting, cream the butter and cream cheese in the bowl of a stand mixer until light and fluffy.  Add the powdered sugar, 1 cup at a time. After it has been incorporated turn the mixer onto the highest setting for about 10 seconds to lighten the frosting.  Add more powdered sugar, if needed, to get a thick consistency. Add in the vanilla and beat until well-blended, light and fluffy.

Thursday, December 7, 2017

Persimmon Rum Bundt Cake

Everyone knows I love to bake so I'm often given food offerings.  This year I seem to be inundated with persimmons.  I have two bags in the garage and have already put pureed portions in the freezer.  I'm scrambling to bake something other than my beloved Grandma's cookies! In my search I found this recipe for a bundt cake, loaded with persimmon puree, walnuts, dates, and dark rum. To make it even more delectable it has a brown butter glaze.  Yum, it was good!


The recipe is a spin-off from a James Beard persimmon bread recipe.  Any type of alcohol can be used, including whiskey and brandy.  I'm not a big fan of either so I chose dark rum. It's definitely noticeable in the cake!

In many parts of the country persimmons are a fall treat. In central California they don't ripen until mid to late-November, so they are perfect for holiday baking. A slice of this cake, a cup of coffee, and Christmas carols playing in the background is the perfect diversion to help get through all the multitude of holiday season chores that await us!


Persimmon Rum Bundt Cake with Brown Butter Glaze

3 1/2 cups all-purpose flour
1 teaspoon ground cinnamon
2 teaspoons baking soda
1/2 teaspoon baking powder
1 1/2 teaspoons salt
1 cup unsalted butter, melted and cooled
3/4 cup dark brown sugar, packed
3/4 cup granulated sugar
4 large eggs, room temperature
3 tablespoons dark rum (whisky or brandy)
2 cups persimmon puree *
2 cups toasted walnuts, coarsely chopped
1 cup dried dates, coarsely chopped

Brown Butter Glaze:

1/2 cup unsalted butter
2 1/2 cups powdered sugar, sifted
1/4 teaspoon salt
1 teaspoon vanilla extract
5 tablespoons milk, or more as needed to get a glaze consistency

Preheat oven to 350 degrees.  Grease a 12-cup bundt pan and set aside.

In a large bowl, whisk together the flour, cinnamon, baking soda, baking powder, and salt. Set aside.

In the bowl of a stand mixer, with a paddle attachment (or use a hand-held mixer), mix together the butter and sugars.  Add eggs and mix until combined.

Add about 1/3  of flour mixture.  Mix on low speed.  Add rum and half of persimmon puree.  Mix and add another 1/3 of flour mixture. Add remaining puree.  Toss dried dates in remaining flour.  Add flour and dates to batter.  Stir together until there are no longer any dry streaks of flour. Add walnuts and fold until evenly distributed.

Pour batter into prepared bundt pan.  Bake for 55-60 minutes, or until toothpick inserted in center of cake comes out clean. Let cake cool in pan for 15 minutes, then invert onto a wire rack and allow to cool to room temperature.

To make the brown butter glaze, melt butter over medium heat in a small saucepan. Once the butter has melted, continue to cook.  Swirl pan occasionally.  Mixture will bubble and foam as it cooks. Continue to cook until butter smells fragrant and nutty.  (The milk solids in the melted butter will turn rich brown in color). Remove from heat and pour into a heat-safe bowl.  Allow brown butter to cool for 20-30 minutes.

Combine cooled butter, powdered sugar, salt, vanilla, and milk in a medium bowl.  Stir until the mixture is smooth.  Glaze should be slightly thick but pourable in consistency.  If desired, add small amounts of milk until desired consistency is achieved. Pour glaze over cooled bundt cake.

* To get persimmon puree, wait for the fruit to be very ripe and soft.  Peel skin, discard seeds, and scoop out soft insides. Process in food processor until pureed.

Monday, December 4, 2017

Peppermint and Roses Tea!

The females in my family recently gathered at my home for our 11th annual Christmas Tea.  Each year I choose a theme and decorate accordingly.  This year's theme was Peppermint and Roses.  Some years I get a little carried away with the decorating (like the year I made 7 gingerbread houses!)  This year I was a little more low-key.  I decorated with red table linens, adorned with peppermint-striped packages and pink flowers in candy cane vases. Each place setting had a napkin folded in a rose shape with a peppermint center.  It was pretty easy to put together and made for festive and colorful tables.


My nephew's fiancée made the wreath!
 As in year's past, I open my home for the tea, provide the tea, fresh-baked scones, homemade lemon curd and homemade strawberry jam.  Everyone else brings a savory or sweet, some bring both. We always have more food than we can eat and it's all great!

I made the sugar bowls from Oui yogurt jars! The roses were easy to make with felt.

My cousin and I started our tea gathering when we were attending a family funeral and lamenting that the only time we saw everyone was at a funeral.  So we gathered everyone together one December afternoon at a local tea room.  I don't think we realized then how special this tradition would become. We all block out the first Saturday after the Thanksgiving weekend on our calendars. My granddaughter spends the night before with me and assists with table setting and decorating. On the day of the tea she gets to play with her second cousins while the two young mothers catch up on each other's lives. My nephew's bride now joins us. Each year it seems I have to add another chair and I don't mind! This year's tea was special for many reasons. Our mothers are aging, with many of the ailments that go with that.  My mom has some dementia issues, which is heartbreaking to witness. Our beloved 93-year old Aunt Millie lost her only child a few months ago and subsequently has moved to an assisted living facility. To say she's devastated would be an understatement. We are all realizing how important it is to gather together, life changes so fast.

A big surprise this year was the arrival of my aunt from Missouri.  She is my Dad's half-sister and only 18 days younger than me! She moved back east when we were in junior high but she comes out to visit every 4-5 years. We managed to keep her visit a surprise and it was so fun to see everyone's reactions when they saw her!

It was especially gratifying to see how much Aunt Millie enjoyed the day. She's been so sad and this family gathering was just what she needed to perk her up. My four-week old great-nephew made his appearance so we now have many pictures to cherish of the newest and oldest members of our family.


I have the 2018 theme rumbling through my head and will start buying some decorating things as Christmas items go on sale. Hopefully, our tea party tradition continues on for many, many more years!

Tuesday, November 28, 2017

Crescent Rolls

Grandma always made homemade rolls for all our family celebrations.  I don't recall that we ever had anything other than homemade! When the time came that she was no longer able to do that activity, Mom took over the duty. It's amazing we had any rolls by dinner because she would be swarmed the minute she walked through the door, everyone wanting a freshly-made warm roll! But, there always seemed to be enough!

Mom now has health issues and is unable to bake anymore.  The baton has been passed to me. For Thanksgiving I was tasked with making pies and rolls for our family gathering.  I went looking for an easy recipe as I would be making them Thanksgiving morning, with not a lot of time to spare. Most of the kneading for these rolls is done in a stand mixer. Then it's a matter of letting the dough rise, shaping the rolls, and rising again.  I accomplished other chores while the rolls were rising.  The rolls were light, fluffy, and, oh, so, buttery. We had a large crowd for Thanksgiving so I made two batches of the rolls.  There were only 6 or so left after dinner.  This is a keeper recipe!  Mom loved them and Grandma would be proud!


Buttery Crescent Rolls

1 1/4 cup warm water
4 teaspoons active dry yeast
3 tablespoons softened butter
2 eggs
1/3 cup sugar
4 1/2 cups all-purpose flour
1 teaspoon salt
1/2 cup softened butter
2 tablespoons melted butter

Combine water, yeast, 3 tablespoons softened butter, eggs, sugar, salt, and 3 cups flour in bowl of a stand mixer.  Mix, using dough hook, until combined, on low speed.  Continue mixing about 5 minutes, gradually adding in the last 1 1/2 cups of flour. (Dough should pull away from side of bowl). Turn  dough out onto floured surface and knead 4-5 times and patting into a ball shape. Cover with kitchen towel and let rise 60-90 minutes, until doubled in size.

Divide dough into two pieces.  On a lightly floured surface, roll one piece into a 12-inch circle.  Spread 1/4 cup softened butter on the circle.  Slice each circle into 12 triangles (I used a pizza cutter).  Roll each triangle up from the outside edge, forming a crescent shape, slightly curving the ends toward the middle. Place on a parchment-lined or greased 12x17-inch cookie sheet (jelly roll pan). Cover with kitchen towel and let rise again for about 45 minutes, until puffed and light.  Repeat with remaining dough ball.

While rolls are rising, preheat oven to 350 degrees.  Bake for 15-20 minutes until tops are golden brown. Brush melted butter on tops of rolls.

Recipe adapted from Its Always Autumn.


Monday, November 13, 2017

2017 Christmas Gift Tags

I've not started Christmas decorating yet.  I'm one of those who has to let the Thanksgiving turkey dinner settle a bit before I can tackle that chore!  However, I'm a pretty organized person and I'm almost done with Christmas shopping ( 2 more gifts to get!) I've also started on doing the gift wrapping.  In connection with that, I've completed the gift tags that will go on this year's packages.  They compliment the gift bags that I previously shared.


Yes, it would easier and more cost-effective to buy gift tags. I have an urge to create and design and this little project helps satisfy that urge. I make them in steps, doing a little at a time when I have a few spare moments. One of my favorite parts of the Christmas holidays is a decorated Christmas tree with pretty packages underneath its branches. My homemade gift tags add a little extra to my packages!

For this year's tags I used a few different shaped wreath stamps.  Using my Silhouette machine I cut out the tag shapes, one slightly larger than the other, and glued together.  I dabbed (is that a word?) red ink along the border of the white tag to add a little color and dimension. A little twine bow and all is done!


Monday, November 6, 2017

Christmas Gift Bags

Christmas Day is 7 weeks from today.  Yikes! Now that Halloween is over, I am finding that many people are already decorating for the Christmas holidays. I'm not ready to decorate yet, I like to celebrate Thanksgiving first! We can't overlook the turkey and pumpkin pie! However, I have been working on getting ready for Christmas for a while now.  I'm about 2/3 done with my Christmas shopping.  My wrapping paper and ribbon supply has been replenished and I've been working on making Christmas gift tags. For small items and gift cards, I use decorated bags that coordinate with the packages under the tree.  I've finished making this year's bags and have some with gifts inside, ready to go under the tree. This year my packages will be wrapped with brown and red kraft paper and coordinating ribbons.  The gift tags I'm making have small wreaths on them so it made sense that the gift bags did, too.  I found an inspiration picture from Papertrey Ink and made my own version, using standard kraft lunch bags. 


Like most paper projects, these bags involved various, but easy, steps.  First up was to make small tags and embellish them. A simple wreath and berries were stamped on the bag, then snowflakes and a peppermint border were stamped and embossed.  A little ribbon and the cute gift bags were done! I have a small TV in my craft room so usually do projects like this with football or the Food Network on in the background. It goes fast!


This project involved learning a new technique for me, embossing.  It was much easier than I thought it would be.  Using a special ink pad, an image is stamped on the paper.  Embossing powder is sprinkled over the wet image, then an embossing heat gun is used to form the embossing.  It was so cool to see this happen, in just a few seconds I had a raised image on the paper. I can see myself using this technique a lot in the future!


As I was doing the embossing my husband came in to my craft room and inquired as to what I was doing (it sounds like a blow dryer).  I showed him and he asked when I had acquired the embossing gun.  This from a man who has a garage full of tools and brings a new one home after each Home Depot trip!  I told him "you have your tools, I have mine!"