Wednesday, September 30, 2015

Marble Pound Cake (and more cake pans!)

I try to be good.  I have so many specialty pans and I swear I don't need more.  Then a new catalog arrives and I have to peek.  You have probably already surmised that I have a new cake pan.  Yep, two of them! My poor children.  When they have to move me to a rest home someday (hopefully many years from now!), they will be uncovering cake pans everywhere. I'm sure it will convince them that they were correct in putting their Mama away! 
 So, with a new pan just waiting to be tried out, I went searching for a recipe. This cake is from the Martha Stewart Baking Handbook. It's not real sweet, has a subtle vanilla and chocolate taste. It makes a great mid-morning snack. And, you have to admit, the new pan makes a pretty cake!
Making a marble cake is just a matter of arranging scoops of the different-flavored batter in the pan and swirling the batter when done.  This combines the batter to make a pretty marbly cake.


Marble Pound Cake

1/2 cup (1 stick) unsalted butter, room temperature, plus more for pan
1 3/4 cups cake flour
2 teaspoons baking powder
1/2 teaspoon salt
1 cup sugar
3 large eggs, room temperature
1 teaspoon pure vanilla extract
2/3 cup buttermilk, room temperature
1/4 cup plus 1 tablespoon Dutch-process cocoa powder

Preheat oven to 350 degrees.  Generously butter a 9-by-5-inch loaf pan; set aside. Whisk together the cake flour, baking powder, and salt; set aside.

In the bowl of an electric mixer fitted with the paddle attachment, beat the butter and sugar until light and fluffy, about 5 minutes. Add eggs, one at a time, beating until combined after each addition and scraping down the sides of the bowl as needed.  Mix in vanilla.  Add flour mixture in 2 batches, alternating with the buttermilk and beginning and ending with the flour.  Set aside 1/3 of the batter.

In a bowl, mix cocoa and 1/4 cup plus 2 tablespoons boiling water with a rubber spatula until smooth.  Add the cocoa mixture to the reserved cake batter; stir until well combined.

Spoon batters into the prepared pan in 2 layers, alternating spoonfuls of vanilla and chocolate to simulate a checkerboard.  To create marbling, run a table knife or wooden skewer through the batters in a swirling motion.

Bake, rotating the pan halfway through, until a cake tester comes out clean, about 40 minutes.  Transfer pan to a rack to cool 10 minutes. Turn out cake from pan and cool completely on the rack.

If you, too, have no willpower you can purchase the pans through these vendors.  The wreath pan can be found at Amazon  or Sur la Table.  The loaf pan was purchased at Williams Sonoma. 

Saturday, September 26, 2015

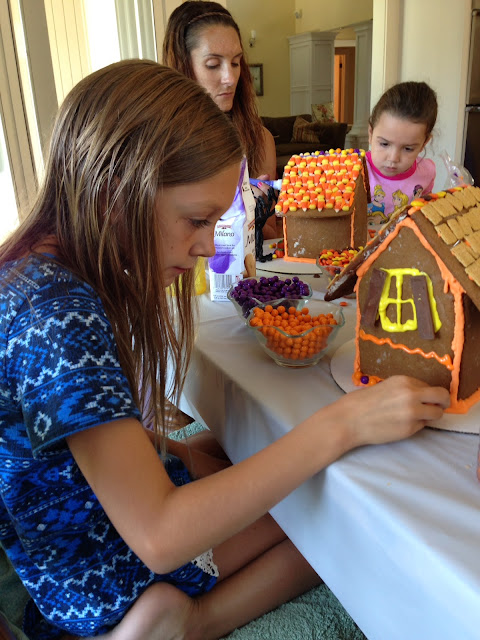
Halloween Gingerbread Houses - 2015

2015 marks the 6th year of doing Halloween gingerbread houses. We began when my first granddaughter was five.  The other two began participating when they were three.  My grandson is only nine months old so I have a few years before we have to make four houses! The houses are truly a joint Nana and Papa collaboration.  I make the dough, cut out the pieces and bake them, as well as accumulate all the candy and other decorations.  Papa puts the houses together.  This year he also made us some spooky licorice trees. Each girl gets an identical house to start with and we let them go from there.

I finally got smart this year and got a plastic tablecloth to corral all the mess.  I put towels on the chairs so I didn't have frosting on the cushions.  Clean up was a breeze this year, I just rolled up the tablecloth and all the mess went with it! Not sure why it took my six years to figure this out!
I love this time with the girls.  We chat, laugh, eat a lot of candy, and lick frosting. They all have such busy schedules, it's getting harder and harder to get everyone together. The cousins enjoy seeing each other and the siblings get along great.  Mommies are allowed to come, though it's not mandatory. Extra hands sure do help! I see progress each year, they get more creative, have specific ideas of what they want to do, and get more proficient working with the piping bags. They are quite proud of their creations and I cherish the memories we have made!


Friday, September 25, 2015

Is It Really Fall?

According to the calendar, fall has arrived. According to the weather, it's still summer! Yikes, it's been warm! The only evidence of fall I see is in the plants and flowers; the summer plants are fading, the morning glory is turning yellow, we had to pull up the sunflowers and we have harvested the pomegranates.

As it's been so un-fallish I just couldn't get into the normal fall decorating with pumpkins, gourds, and harvest colors. In a few weeks I'll get there but not yet! In the meantime, to celebrate the transition from summer to fall, I did a little decorating with an apple theme. Apples and fall go hand-in-hand.


For the mantle I made a burlap banner, incorporating a bright red apple. I decorated a small grape vine wreath with some greenery and apples. An antique bucket, with some wooden apples, carries out the theme.


The dining room table is anchored by an apple print table runner.
My wooden dough bowl holds an assortment of apples from our espalier tree.
I had this wreath, the little green orbs remind me of green apples, so that's the vibe I'm hoping it gives off when people enter our front door!
Pumpkins are arriving in the stores, the pumpkin patches are getting ready to open.  Soon I'll join in and decorate with the more traditional fall/harvest colors. For now, we're living with apples!

Sunday, September 20, 2015

Pear Vanilla Jam

It's the last Sunday of summer and we are expecting the temperature to get to the upper-90's today. The arrival of fresh pears and apples at the Farmers Market reminds me that fall will be here eventually. In the meantime I was thankful for the air conditioning as I worked over the hot stove making this jam!
I've always loved pears.  One of my favorite childhood treats was a pear cobbler Grandma would make me. This jam is very reminiscent of that cobbler and the addition of the vanilla beans is just amazing. The jam is wonderful with hot biscuits or sour cream muffins  and would be a wonderful topping to pancakes or ebelskivers.

Pear Vanilla Jam

8 cups chopped pears (no need to peel them)
2 vanilla beans, split and seeded
4 cups sugar
1 packet liquid pectin

Wash jars, lids and screw bands in hot soapy water; rinse well. Pour boiling water over flat lids in saucepan.  Let stand in hot water until ready to use.  Keep jars hot (I keep them in a pot of boiling water).

Chop enough pears to measure 8 cups.  Place the pears, vanilla bean seeds, pods, and sugar in a 8-quart pot, and cook over medium heat until the pears are soft.  Mash half of the pears with a potato masher (can be done in the pot). Remove the vanilla pods and bring to a boil.  Add liquid pectin, stir, and bring to a rolling boil.  Boil for 5 minutes, stirring constantly.

Ladle immediately into clean and hot jars, filling to within 1/4 inch of tops. Wipe jar rims and threads with warm wet cloth or paper towel.  Cover with hot lids and screw bands on.  Process according to USDA water bath standards or, do as Grandma did, and turn the jars upside down for 5 minutes. Turn jars over.  Lids will "pop" so you know they are sealed.

I buy vanilla beans in bulk here.  I store them in a mason jar and they last a long time. Besides being used in baking, I also use vanilla beans to make homemade vanilla extract and always have a container of vanilla sugar on my countertop.

Wednesday, September 16, 2015

Counting Our Blessings Tonight

Daily, I try to focus on the many blessings in my life. Some days those blessings are huge, as in when a grandchild is born. Some days it may be the sight of a hummingbird flitting amongst the flowers. On particularly bad days it may be that I found the strength to get through one more day. I find that focusing on the good things in my life helps to get me through the trying times.  There is always something good to be found in any situation, we may have to look a little harder to find it.

Today my daughter had shoulder replacement surgery. The surgery went well and she should be back to full strength in about 6 weeks. About 10 days ago she was moving an ottoman and felt her arm snap. The initial diagnosis was that she had a form of bone cancer called multiple myeloma. Not good.

But we've been down this road before and, thankfully, the initial diagnosis was incorrect. My two children have a bone disorder called fibrous dysplasia. Fibrous dysplasia is an uncommon bone disorder in which scar-like (fibrous) tissue develops in place of normal bone. This can weaken the affected bone and cause it to deform or fracture. 

At the age of 15, my daughter jumped in the lake and broke her back.  That began our journey with this disorder.  Seven years ago my son had a bicycle accident and broke his shoulder (he and his sister now have matching hardware).  X-rays showed a tumor, the doctors thought he had cancer, but it was fibrous dysplasia.

Bone scans show my children have the dysplasia in other parts of their bodies.  Who knows what future medical issues will arise?  But, today that doesn't matter. Fibrous dysplasia is a much better diagnosis than cancer. And for this, I am counting my blessings!

Monday, September 14, 2015

Strawberries and Football?

In most parts of the country, the beginning of football season corresponds with the beginning of fall. The leaves are turning, there is a chill in the air, the tailgaters are serving chili.  The seasons change a little slower in central California and the start of the 2015 NFL season was ushered in with temperatures in the upper-90's. While there were some apples and squash at the Farmers' Market, I was still able to buy some gorgeous strawberries. I hadn't yet made my granddaughters their annual batches of strawberry jam so I found myself in the kitchen, doing what would normally be a spring endeavor,  and enjoying the boys of fall. It was quite a contrast of seasons!

The berries are just as plump and flavorful as the ones we got in the spring!
Those that know me know I love my football Sundays.  When we remodeled our home I made sure to have a TV in the kitchen so I wouldn't miss a down (and so my family wouldn't miss a dinner!) With the TV blaring, I made a batch of strawberry freezer jam and two batches of cooked jam.  My granddaughters have enough jam to last them for a while!  


I can't view the TV from the sink area so the dishes had to wait until halftime.  I asked for a maid but no one ever showed up!

Tonight it's Monday Night Football (go Niners!) On the agenda tonight?  Cutting out and baking pieces for Halloween gingerbread houses. That's a little more fall-oriented than strawberry jam!

Saturday, September 12, 2015

Dutch Apple Pie

I love fruit crisps and I love fruit pies.  A Dutch apple pie combines the best of both worlds; a pie crust filled with cinnamony (is that a word?) apples and topped with a crisp-type topping. Now what's not to love about that combination? 
 
My Hubbers recently returned home from a two-week bicycle trip up to Glacier National Park, Idaho, and the Oregon coast.  Besides a hug and a kiss, I thought it would be nice to welcome him home with a dessert. I finished harvesting the apple crop from our espalier tree so this apple pie was a natural choice. We had it for dessert, we had it for breakfast.  It's really quite delectable!


Dutch Apple Pie

Pie dough for one 9-inch pie (homemade or ready-made)
5 1/2 cups peeled, cored, and sliced apples
1 tablespoon lemon juice
1/2 cup granulated sugar
1/4 cup brown sugar, packed
3 tablespoons flour
1/2 teaspoon ground cinnamon
1/4 teaspoon nutmeg

Topping:
3/4 cup flour
1/4 cup granulated sugar
1/4 cup brown sugar, packed
1/3 cup butter, room temperature

Preheat oven to 375 degrees.

Roll out pie dough and fit into pie plate.

In a large bowl, mix sliced apples, lemon juice, both sugars, flour, cinnamon, and nutmeg. 

Arrange into crust.

For topping, in a medium bowl, with a pastry blender or fork, mix flour, both sugars, and butter until coarsely crumbled. 

Sprinkle evenly over apples.

Bake for 50 minutes, until topping is browned and apples are bubbling.

Our little espalier apple tree has been pretty prolific this year, we've gotten about three buckets of apples.  This is the last of them, soon to go into a batch of apple butter!


Sunday, September 6, 2015

Corralling a Collection!

I didn't start out planning a cookie cutter/decorating supplies collection.  Little by little, as I explored sugar cookie decorating, I'd buy a cutter, decorative sprinkles, piping supplies.  Soon those items outgrew my spot in the kitchen so I put them in the garage cabinets.  After a while my collection outgrew that spot and I put the excess in a box (that usually sat on the garage floor, much to my Hubber's chagrin). When it came time to make sugar cookies I would spend a lot of time searching for the cookie cutter I wanted or I would forget I had a certain cutter and buy a duplicate (does a person really need 4 bee cookie cutters?) I either had multiple bottles of certain color sprinkles or sanding sugar or, worst yet, none; usually discovered when I was knee-deep in a project. For someone who is pretty organized this was becoming a problem, something had to be done, the collection was getting out of control!

I procrastinated for a while because part of my organization involved eliminating one of my cabinets of cookbooks.  With so many recipes and ideas available online these days I find I don't use my cookbooks like I used to.  I finally went through them and eliminated three boxes full of cookbooks, keeping only the ones I use on a regular basis or sentimental ones. With an empty cabinet at my disposal I got to work.  All the sprinkles, candies, sugars are arranged by color. Now I can easily determine if I have the necessary supplies when I plan a sugar cookie project.  I bought plastic filing cabinets and now all the piping bags and tips are in one spot, the ones I have the most of, and use more often, are in small jars.  Sticks for cake pops, decorative straws, decorative toppers all have their own space now.


My cookie cutter collection remains in the garage but they are now organized.  Each box is numbered and has a corresponding Excel spreadsheet telling me what is in the box. I tried to organize each box so that similar type cutters were inside, for example, one box contains holiday cookie cutters. Now when I want to know where a certain cookie cutter is I just go to my spreadsheets (the inner accountant comes out in me with the use of spreadsheets!)


My Hubbers arrives home from his two week biking adventure tomorrow.  He's going to be so thrilled to see there are no longer boxes of "stuff" in front of the cabinets!

Tuesday, September 1, 2015

E-Mails = Successful Shopping!

While in the Napa Valley in July we had dinner at The Farmstead at Long Meadow Ranch.  If you have a chance to go there, you should.  The food and service were fantastic.  I was especially enamored with the décor and atmosphere, it had a farmhouse vibe to it both in and out of the restaurant. There was a small gift shop and wine tasting room, a wonderful vegetable garden that the chefs utilized in their daily menu.  But I fell in love with the bottle carriers they had on all the tables. I kept gushing about them.  Pretty soon my daughter-in-law was on her phone showing me similar items on Etsy and Ebay. I took a picture for reference and began looking around for one.  Each one I found just didn't thrill me like the ones at the restaurant.  So I e-mailed them.  I got a wonderful e-mail back from the manager with the source of where they got the carriers. I e-mailed the company and got contact information.  I had a conversation with the owner, the nicest Texan lady, (loved her southern drawl), and ordered my bottle carrier. How did I ever shop without the internet?
I filled my bottle carrier with large mason jars.  Today they have flowers in them.  I have visions of using candles for some occasions. This carrier can go outside, also, when the situation warrants.  It adds a little more farmhouse style to my urban farmhouse kitchen.