Saturday, January 18, 2014

Orange Cream Chiffon Cake

I seem to be on an orange kick lately. Oranges are about the only fresh fruit in the produce section of our supermarkets that are local and ripe. This weekend I will be baking some orange marmalade rolls. I made the Whole Orange Cake on Sunday.  And a few days ago I made this luscious chiffon cake for Stitch 'n Bitch (this is my last Stitch 'n Bitch until after tax season.  I will miss my Friday mornings with friends and my stitching project).

A chiffon cake is very similar to an angel food cake.  An angel food cake is made with only the egg whites and has no leavening in it.  A chiffon cake uses both the egg whites and yolks and usually has a leavening ingredient to it. A chiffon cake is still very light and airy just not as much as an angel food cake.  They are baked in the same tube-style pan. Both cakes are very easy to make, the only thing to be careful with is to make sure to  gently fold the egg whites into the flour mixture.  The egg whites are what gives the cake its light texture, beating the mixture will deflate the egg whites and leave you with a dense cake.
We devoured this cake! It's got a nice orange flavor to it, not overpowering.  The filling is not real heavy and does not overpower the lightness of the cake.

                    ORANGE CREAM CHIFFON CAKE

9 eggs, separated

1 cup sugar, divided

1/4 cup orange juice
4 teaspoons orange peel
1 cup plus 2 tablespoons all-purpose flour
1 teaspoon cream of tartar
1/2 teaspoon salt

FILLING:
1 cup sugar
¼ cup all-purpose flour
¼ teaspoon salt
½ cup orange juice
1 egg, lightly beaten
4 teaspoons grated orange peel
1 pint whipping cream, whipped

 Preheat oven to 325°.
Place egg white in a large bowl; let stand at room temperature for 30 minutes.  In another large bowl, beat egg yolks until slightly thickened.  Gradually add 1/3 cup sugar, beating until thick and lemon-colored. Blend in orange juice and peel.  Add flour and remaining 2/3 cup sugar to yolk mixture; mix well.

Add cream of tartar and salt to egg whites; beat with clean beaters until stiff peaks form.  Fold into  batter.  Gently spoon into an ungreased 10-inch tube pan.  Cut through batter with a knife to remove air pockets.
Bake at 325° on lowest oven rack 40-50 minutes or until top springs back when lightly touched.  Immediately invert pan (I use a bottle); cool completely, about 1 ½ hours.  Run a knife around sides and center tube of pan; remove cake.

For filling, in a double boiler or a metal bowl over simmering water, combine the sugar, flour and salt.  Add the orange juice, egg and orange peel.  Constantly whisk until mixture reaches 160° or is thick enough to coat the back of a spoon.  Remove from heat and cool completely.  Fold in whipped cream.

Cut cake horizontally into three layers.  Place bottom layer on a serving plate; top with one-third of the filling.  Repeat layers twice.  Serve immediately or refrigerate.


Wednesday, January 15, 2014

Whole Orange Cake

I like to cook and bake with in-season ingredients.  I'm fortunate enough to live in a prime agriculture area, where fresh produce can be found at farm stands and farmers' markets everywhere. Alas, not much grows in winter except for citrus fruits but there are many wonderful things to be made with citrus. 

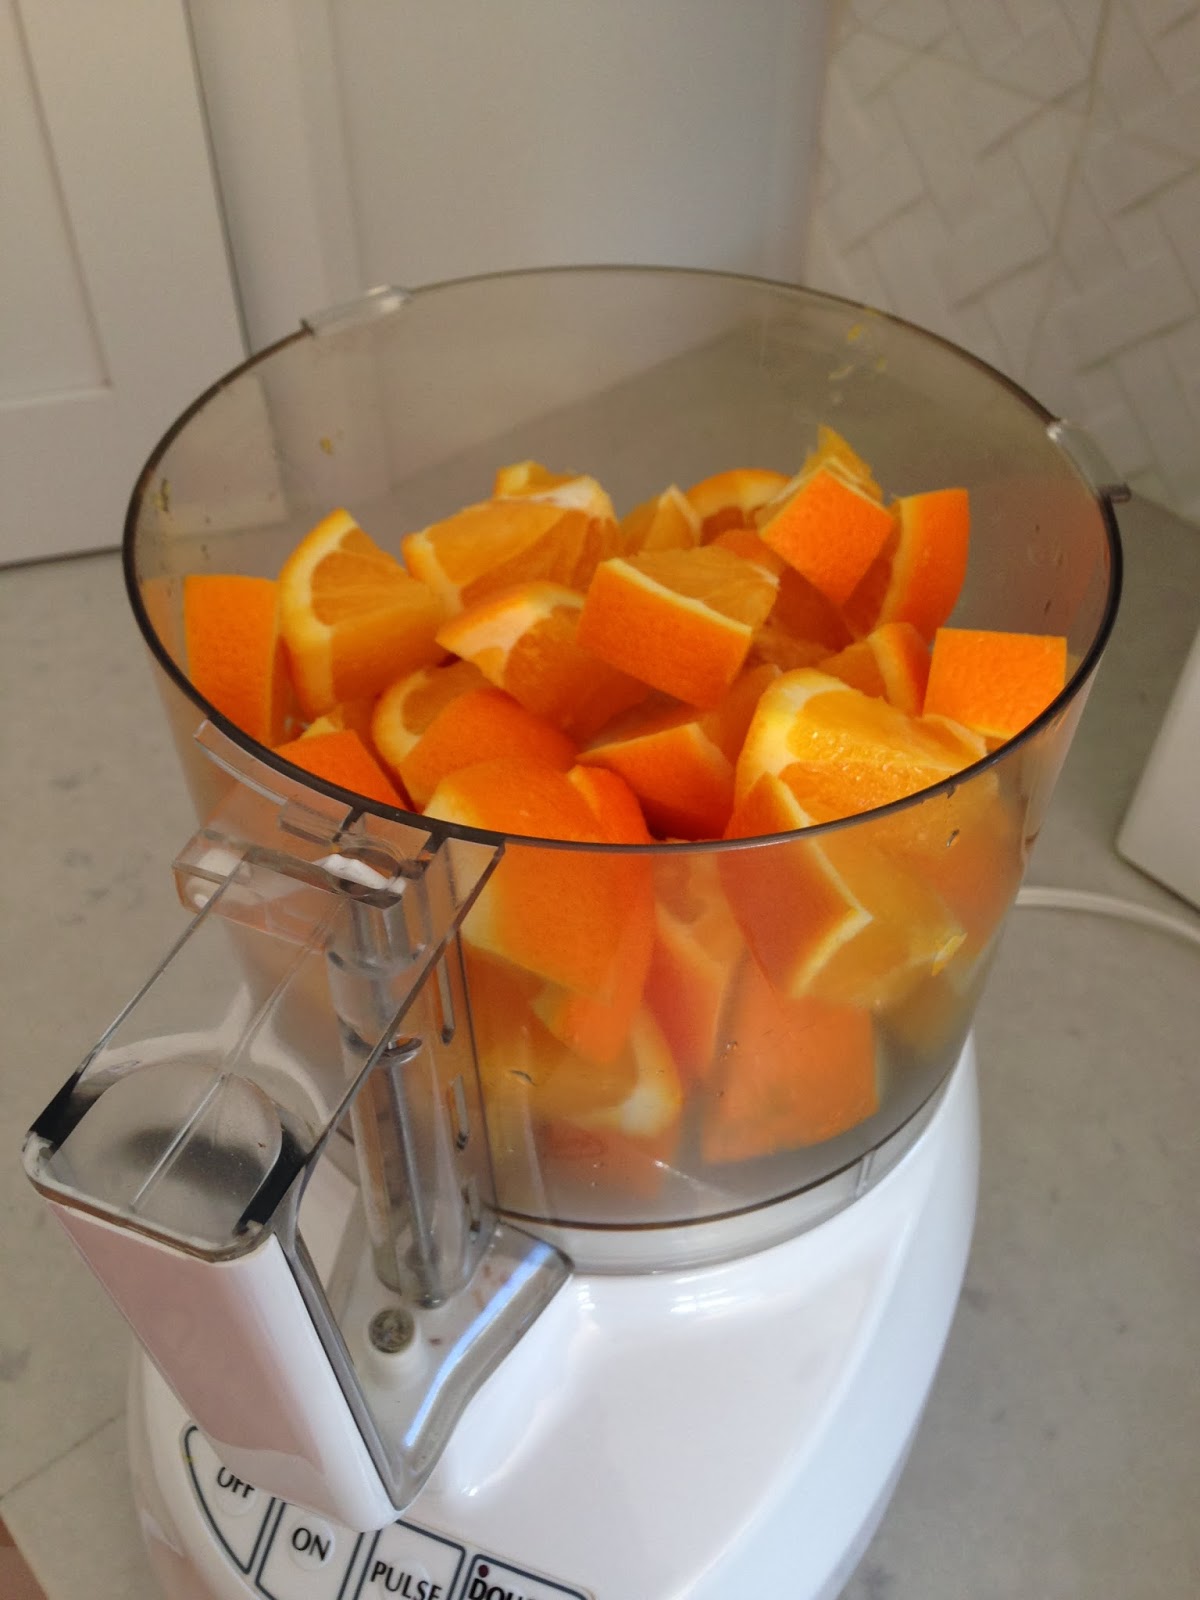
A friend introduced me to this recipe.  It's from Sunset magazine and was one of their most-requested recipes for 2013. The recipe intrigued me and made me suspicious at the same time as the major ingredient is whole, pureed oranges. Yes, peel, pith and all.  I thought how could this not be bitter? I had to try it! Surprisingly, it's not bitter.  It's got lots of orange flavor and the small chunks of peel are tender after baking.  It's a moist, dense cake.  I think it's a good cake to serve for brunch or tea, more so than an after-dinner dessert. It was very easy to put together and the orange aroma in my kitchen, as it was baking, was intoxicating. My hubby & I each had a piece and the remainder went to our office.  Everyone loved it so I will definitely make this again.

Throw the orange chunks in your food processor and whirl, until just small pieces of orange rind remain. 


                                                      WHOLE ORANGE CAKE

1 cup butter, softened

1 ¼ cups granulated sugar

3 large eggs

2 oranges (about 1 lb. total), ends trimmed, then cut into chunks and seeded

2 ½ cups flour

¼ teaspoon salt

¼ teaspoon baking soda

½ teaspoon baking powder

1 ½ cups powdered sugar

2 tablespoons plus 1 teaspoon orange juice

 Preheat oven to 325 °.  Coat a 10-cup Bundt pan with cooking-oil spray.  In a large bowl with a mixer on medium speed, beat butter and granulated sugar until fluffy.  Beat in eggs.

 Whirl orange chunks in a food processor until mostly smooth but not pureed.  Add 1 ½ cups orange mixture to batter and beat until blended.  Add flour, salt, baking soda, and baking powder to bowl and beat until smooth.  Spread batter in prepared pan.

 Bake until a toothpick inserted in the center comes out with only a few crumbs clinging to it, about 55 minutes.  Cool pan on a rack 10 minutes, then invert cake onto rack and let cool completely.

 Whisk together powdered sugar and orange juice in a small bowl (adding more juice, as needed).  Drizzle over cooled cake.  Let glaze set, then slice cake.


Saturday, January 11, 2014

The "Old" Pink Coat

If you know me, or have been following this blog, you know I love and treasure hand-me-downs, especially if they come from family or close friends. Most of my vintage items aren't worth much monetarily, but they are priceless to me (cue the Visa commercial!) I display them in both the traditional ways, such as on a shelf or cabinet, and in non-traditional ways. I believe old treasures should be used and appreciated, not kept in a box and saved for a "special occasion".

One of my most sentimental items is a pink corduroy baby's coat and hat.  I wore it as a baby.  I'm sure my sister wore it, too, as we were not an affluent family and my hand-me-downs became hers.  Unfortunately, as the third child, pictures of her aren't as plentiful as mine and I've yet to find a picture of her wearing this coat. This picture of my Mom and I was taken in Klamath Falls, Oregon (where my Dad was raised) in 1957.
Fast forward to 1985 and I now have a daughter of my own. Mom retrieved the coat from its storage spot and my daughter wore it on more than one occasion.
After she outgrew it, I packed it away. I presented it to her at her baby shower in 2010.
And, later that year, a third generation of babies wore that coat and hat!
Once more it has been packed away.  I hope I am around to see another little girl wearing it someday! In another 20 years or so I'll only be in my mid-70's!

In making this post, one thing I've noticed is we all have the same fat cheeks! There is no denying the mother-daughter-granddaughter relationship!


Tuesday, January 7, 2014

Friday, January 3, 2014

This is Winter?

On a day when the northeast part of our country is socked in with rain, snow and frigid temps, we are enjoying almost spring-like conditions in the central California valley.  Except for about a week of freezing nights, we have had a very mild winter.  Alas, we've had no rain which is not a good thing. This is farm country and we need the rain and snow to fill up the reservoirs and provide irrigation water this summer.  We'll soon be doing rain dances out here if we don't get rain soon!

On this mid-60 degree day I got a lot of yard work done.  I weeded, pruned, pulled out dead perennials, refilled the hummingbird feeders (I have birds all year long) and worked up a sweat! I will go into my busy tax season schedule with my yard in pretty good condition, which means less catch-up after April 15! California has its share of problems but you can't beat the weather!

Only 169 days until summer!


Wednesday, January 1, 2014

New Year's Eve Dinner For Two

My hubby and I haven't gone out on New Year's Eve since our son was 2 months old, which was 31 years ago! We have hosted a few New Year's Eve dinners but prefer to spend the evening with just the two of us.  We never see midnight, unless someone calls or nearby fireworks wake us up. Party poopers we may be!

This year I set us a table in front of the fireplace using silver, white and purple in the chargers, plates, napkins, candles, flowers and confetti. Just because we're eating in doesn't mean it can't be a nice experience.  It wasn't all fancy, though, as we were dressed in our flannel pj's. That might have taken the romanticism down a notch or two! But, that's one of the advantages of staying home, not having to get dressed up!


Our dinner started out with a simple iceberg lettuce wedge salad.  My hubby loves this type of salad.  I jazzed it up a little bit with some chopped tomatoes, boiled egg and crumbled bacon.
Our main dish was luscious and one I will make again, Lobster Pasta with Herbed Cream Sauce (recipe here). The original recipe called for live lobsters.  I have two problems with that. One, they are hard to come by in central California and, two, I don't have the heart to put a live lobster in a pot of boiling water.  Sorry, just cannot do that! Instead, I bought 3 lobster tails and steamed them before proceeding with the rest of the recipe.  This dish was so good, I can't imagine that using whole, live lobsters would make it any better.
Part of this recipe involves infusing the warm cream with herbs and the lobster shells, then straining.  The sauce is almost like a lobster bisque. Later, the pieces of pre-cooked lobster are added back to the sauce and mixed with the pasta.
 
We love fresh, homemade pasta but the process has always intimidated me. Why, I don't know, as it's really not that difficult.  Over the last few years I've made pasta more frequently and each time it gets easier and less intimidating.  I had no problems making the fettuccine.  In fact, it was going so easy that we were talking about what pasta we would make next (ravioli, in case you're interested!) I have a pasta attachment for my KitchenAid mixer which makes the process even easier.
The only problem with eating at home is there are no busboys or dishwashers to clean up the mess! So we took a break to do some dishes, clean the kitchen and let our meal digest before having dessert. It was worth the wait. I made Panna Cotta which, in Italian, means cooked cream (recipe here) and topped it with mixed berries.  It was light and airy, just enough of a sweet so that we knew we had dessert but didn't leave us feeling stuffed.
As a sign that this is a "real" event you can see that I failed to notice the charger had pasta spilled on it.  Oops! So, I won't be winning any photo awards!
It was nice to have a quiet evening at home.  We are both CPA's and about to get slammed with tax season.  Quiet dinners won't be happening again until after April 15.  Some nights we'll be lucky to even have dinner! So, we toasted to the new year knowing the next few months will be crazy but knowing we will make it to the end, we always do!

 
 I am linking up to Tablescape Thursday!

Friday, December 27, 2013

Cinnamon Roll Snafu - Keeping Things Real!

One thing about my blog is that it truly chronicles the domestic happenings in my life.  If I show a tablescape it's because we ate a dinner like that, not because I'm setting up for a photo shoot. The food I cook, the things I sew, I show you with all their imperfections. My photography isn't always the best. Somedays things go better than others and somedays, no matter what you do, things just go awry!
 Such was the case Christmas Eve.  Every Christmas morning I host a Christmas brunch.  I sent a message to the kids a few weeks ago, asking if they had any special requests.  My daughters all requested cinnamon rolls. My plan was to make two batches of rolls and let sit in the refrigerator overnight.  In the morning I take them out about a half hour before baking to warm up and do the final rise. This is a nice method as it means I don't have to get up at the crack of dawn to make the yeast dough!  On Christmas Eve morning I got up early and was at the grocery store at 6:45 a.m. for our Christmas perishables.  Upon arriving home, I unloaded the groceries and set about to getting the cinnamon rolls going.  As I had a busy day planned I opted to make the dough in my bread machine (Zo).  If you are familiar with this type of bread machine you know that there is a pan that snaps into the machine as well as two dough hooks that snap into the pan.  I'm familiar with that but in my ultra-efficiency that morning I didn't check to make sure those two steps were done.  I put the ingredients in, started the machine and set about to doing other brunch-related chores.  When the buzzer went off, telling me the dough was done, I opened the lid and had nothing but dry ingredients.  I had neglected to snap the pan in!  Ooops!  So I snapped it in and re-started it.  A wise woman would've also checked to make sure the dough hooks were snapped in.  Yes, you guessed it, after the end of the second dough prep cycle I lifted the lid to another pan of dry ingredients! By now, I'm starting to panic as it's  mid-day and no dough has been made.  Finally, the third and fourth times were the charm.  I was beginning to think the kids were going to get cinnamon toast for brunch, not rolls! As it was Christmas I arranged the rolls in the shape of a tree.
I enjoy baking yeast breads but it is time consuming. The mixing, the kneading, the rising, the shaping, the second rising.  Having a bread machine gives me the flexibility of allowing the machine to do all the kneading and the first rise so that I can tend to other chores in my never-ending list of chores.  I prefer to bake in the oven so usually only use the machine to make the dough.  Even with my snafu I had two batches of cinnamon rolls in the refrigerator within four hours. However, instead of being out of the kitchen by noon it was four before I was done! Never a dull moment around here!

Bread Machine Sweet Dough (for Cinnamon Rolls)

1 cup water
1 large egg
3 1/4 cups bread flour
4 tablespoons sugar
1 teaspoon salt
3 tablespoons dry milk
1/4 cup butter (cut in small cubes)
1 1/2 teaspoons active dry yeast

Place ingredients in the bread machine, per the instructions to your machine. Run on dough cycle.

Once dough cycle is done, remove dough from pan and place on lightly floured surface.

Roll to a 9x12" rectangle.  Spread with 1/4 cup softened butter.

Combine 1/2 cup brown sugar and 2 tablespoons cinnamon in small bowl. Sprinkle over surface of dough.

Starting with the 12-inch side, roll dough jelly-roll style, pinch seam to seal.  With seam side down, cut into 1-inch pieces (I used dental floss rather than a knife, so much easier!)

Place on greased baking sheet 2 inches apart.  Cover lightly with damp towel.  Allow to rise in warm place until size doubles, about 40 minutes to 1 hour.  (Or cover tightly with plastic wrap and place in refrigerator overnight, it will have a slow rise.  One half hour before baking remove from refrigerator, remove plastic wrap and let come to room temperature).

Bake at 375 degrees for 10 to 15 minutes.