Showing posts with label Birthday. Show all posts

Saturday, January 9, 2016

A Mickey Mouse First Birthday Party!

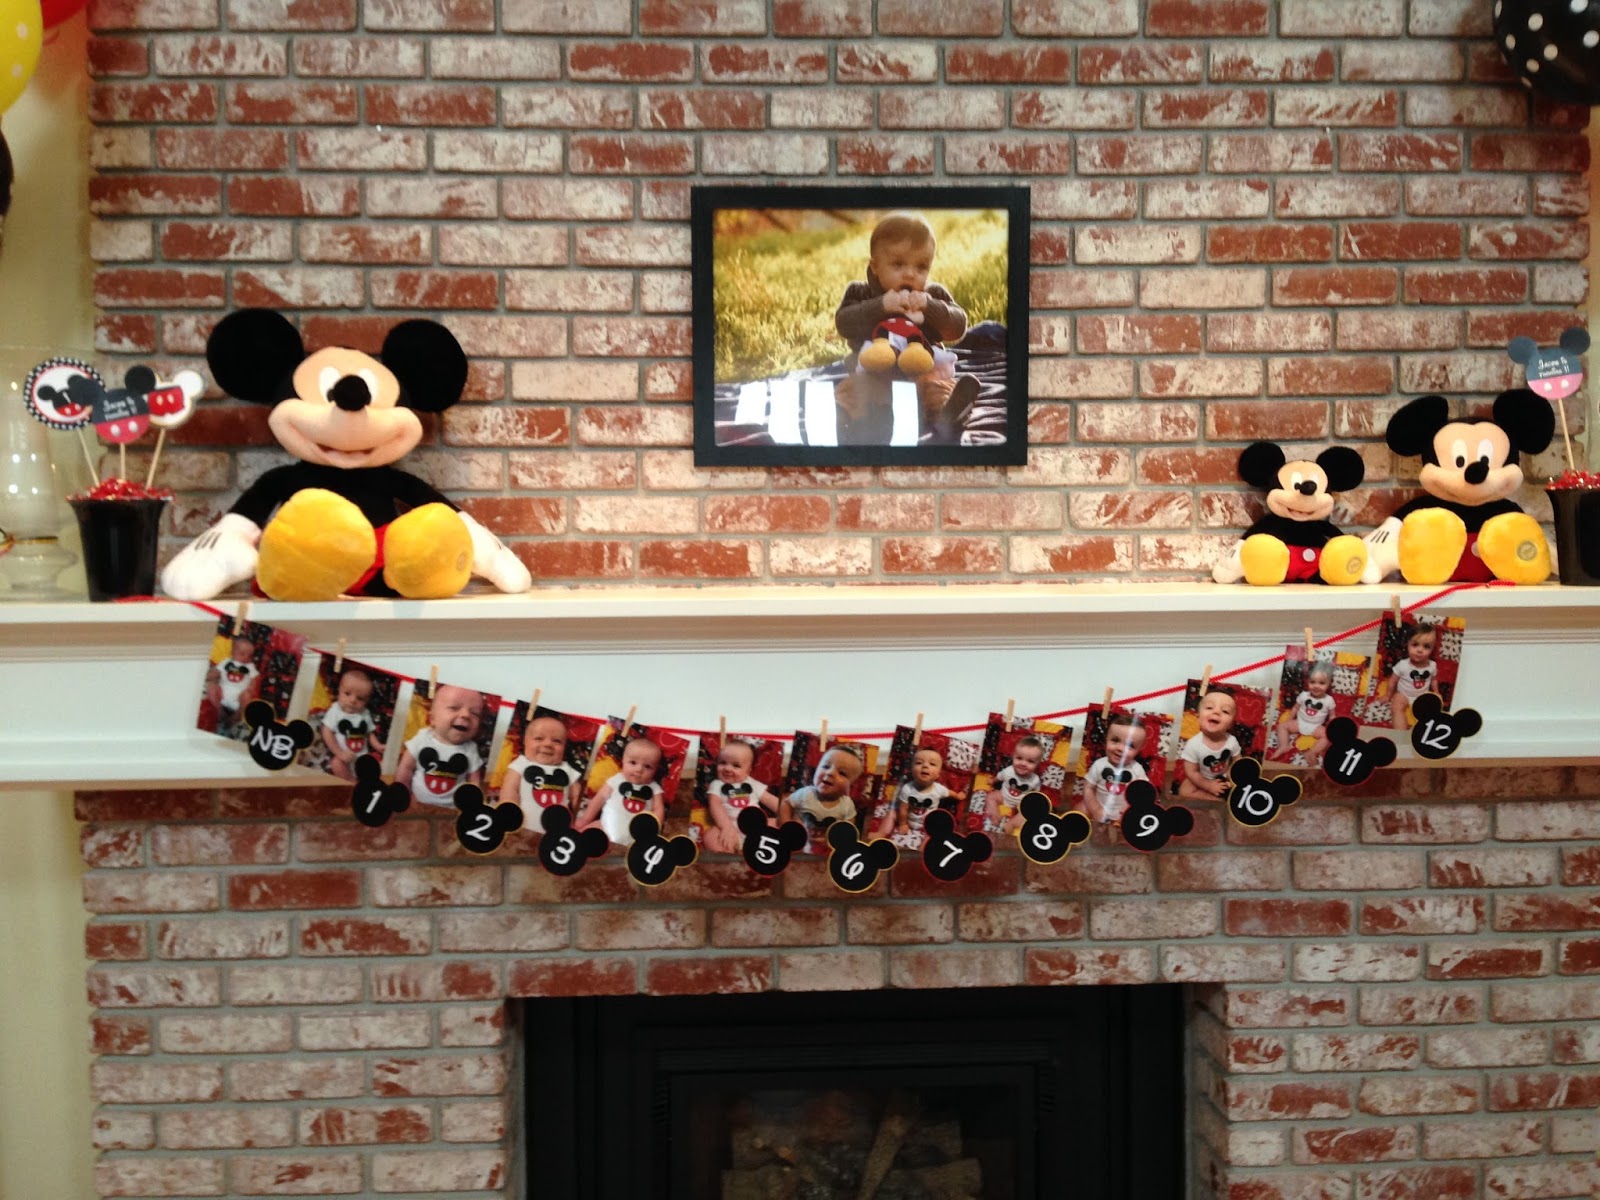
My daughter-in-love is a big Disney fan.  When she was pregnant she was given a Mickey Mouse-themed baby shower by her friends.  I made a Mickey rag quilt and Mickey labels that were used to chronicle each month of our grandson's first year. It was only natural that his first birthday party have a Mickey Mouse theme, too!
I saw a cake stand, similar to this, online over a year ago.  I looked everywhere for the source and couldn't find one.  My daughter-in-love's father is a great woodworker so I enlisted him to make this for me.  I suspect we will use it for many future gatherings and loan it out.  It is so cute and was the perfect centerpiece for the birthday cake!
I made the sugar cookies.  As I had eye surgery on the day I was doing cookies I knew I couldn't do the normal royal icing decorated ones, so sugar crystals had to do!
The party was in our home but our daughter-in-love did everything else; the cupcakes, Rice Kripies treats, candy coated pretzel sticks, popcorn, putting together the banners, table centerpieces, etc. She did a great job!


My favorite part was this display of our grandson's first year, wearing a white onesie and his month labels, sitting on his Mickey quilt.  Seeing the transition from a newborn to a one-year old just melts your heart!
The birthday boy got his first taste of sugar, he was very tentative about it, but enjoyed it. Happy first birthday, sweet Jakey!

Tuesday, December 1, 2015

Black Bottom Banana Cream Pie

It is the custom in our family that the birthday person gets the dessert of their choosing for their special day.  Recently we celebrated my son's 33rd birthday (how can I possibly have a child that old?)  I asked him what he wanted and he said "something with chocolate and bananas".  Hmmmm....what to make? I decided to do my version of a black bottom pie.  A black bottom pie is basically a cream pie with a layer of chocolate.  I added a layer of sliced bananas between the chocolate and the vanilla cream layer. The vanilla cream is a variation of the recipe my Mom has been making all her married life.  She uses milk, I use half & half. Eating this pie was like eating a chocolate covered banana with a bonus of pudding!  Oh, my, it was yummy! I made two pies; there was enough for all of us to have a piece and enough for the birthday boy to take the leftovers home.

Black Bottom Banana Cream Pie

9" baked pie shell

1/2 cup semisweet chocolate chips
1/4 cup heavy (whipping) cream

2 bananas, peeled and sliced

2 tablespoons flour
1/2 teaspoon salt
2 tablespoons cornstarch
2/3 cup sugar
2 cups half & half
3 egg yolks
1 teaspoon vanilla
1 tablespoon butter

Bring whipping cream to boil (on stovetop or microwave).  Pour over chocolate chips and let sit for 2 minutes.  Stir until thoroughly combined.  Pour on bottom of baked pie shell.  Top with a layer of sliced bananas.

In a medium pan, combine flour, salt, cornstarch and sugar.  Stir in half & half until combined.  Bring to boil over low heat.  Cook until thickened, stirring constantly. Remove from heat.  Combine the three egg yolks and one cup of the hot pudding, lightly beating until combined.  Add egg/pudding mixture back to remaining pudding in pan. Cook over low heat for two minutes, stirring constantly. Remove from heat, stir in vanilla and butter.

Pour pudding over chocolate and banana layers.  Cover tightly with plastic wrap, pressing wrap onto the pudding (this is so you don't get a "crust").  Refrigerate at least 4 hours.

Top pie with sweetened whipped cream or meringue.

Sunday, August 23, 2015

Birthday Pool Party!

Summer birthdays in my family traditionally revolve around our pool.  The kids don't get bored, the older generations have time to chat, and clean-up is a breeze; we just throw away the garbage and get out the hose! Our youngest granddaughter is turning 5 in a few days. Nana & Papa's backyard was, once again, called in to service.  No complaints from me, I love hosting a party!

My daughter found cute invitations and other printables on Etsy.  These are so convenient and inexpensive, you pay a small fee (usually $7-10) and get an electronic file modified with your details.  The paper products can be printed at home or at a local office supply/printing store.


We filled the pool with beach balls, had a stock of foam squirt guns at the ready. We have an inflatable water slide for such occasions so Papa got out the air compressor and filled it up.  We made "goody bags" out of sand buckets, filling them with fruit roll-ups, Goldfish crackers, sunglasses, flip flop shaped bubble decanters, and candy. Beach ball sugar cookies were our thank you gift to our guests.


One of my favorite things was a photo booth we set up.  Again, we turned to Etsy and got printable photo props such as sunglasses, snorkel gear, watermelon, etc. My daughter glued them to chopsticks for easy handling. So fun!
 
Instead of birthday cake we made ice cream cone cupcakes. They were decorated to look as if the little graham cracker bears were enjoying time in the pool.
The best part of the party was watching the kids enjoy themselves. Nothing fills my heart more with joy than the sound of children laughing and playing. All four of my grandchildren were in attendance, as well as some of the birthday girl's friends. I jumped in and joined the squirt gun battle!
 
 All the activity wore the birthday girl out! I can't believe she's turning 5!

Monday, August 19, 2013

Birthday Dessert

For as long as I can remember birthday dinners and dessert choices were always left up to the birthday person. (I have had tacos on my birthday for over 50 years now!) I've followed this tradition with our children. We recently celebrated our daughter's birthday. I didn't have to ask what to make for dessert, it's a given that her all-time favorite dessert is cream puff "cake". It's easy, it's decadent and definitely not low-cal, but birthdays are meant to be celebrated with lots of whipped cream, right!

The base of the cake starts with a basic cream puff dough. Instead of making individual cream puffs the dough is spread in a pan, then topped with layers of the pudding filling and whipped cream. It's much easier than making individual cream puffs! Cream puff dough is not difficult to make. I've observed, however, that the mere mention of cream puffs makes a novice baker shake their head and say that's too complicated. In reality, it's one of the easiest things to make!

To start it's a basic process of combining butter & water and letting come to a boil; stir in flour and stir until the mixture pulls away from the pan.
At this point eggs are added, one at a time, until you get a shiny, sticky dough. This process can be done with a spoon but I find it so much easier to plop the mixture into my mixing bowl and let the mixer do the work!
If regular cream puffs were being made this is the point where the puffs would be piped or spooned onto a baking sheet. In this version the dough is spread in a baking pan, spreading part way up the sides, to make a receptacle for the filling.
Steam forms as the puff bakes, and the strong gluten structure formed by beating the dough stretches to hold the steam. The puff will be golden brown, with a hollow center crisscrossed with soft filaments of dough.   If the middle is too puffy I will often take a small wooden skewer and make a few holes to let some of the steam out.  This flattens out the puff some, making it easier to spread with the filling.
Now fill with the pudding and whipped cream layers and you will have a dessert that is as good as any cream puff and much less labor-intensive!


Cream Puff Cake


1 cup water

½ cup butter

1 cup all-purpose flour

4 eggs

1(8 ounce) package cream cheese, softened

4 cups milk

3 (3.5 ounce) packages instant vanilla pudding mix

1 (12 ounce) container frozen whipped topping, thawed (I used freshly whipped cream, sweetened to taste)

¼ cup chocolate syrup

 
Preheat oven to 400°.

 
In a large heavy saucepan, heat butter and water to boiling over medium-high heat.  Add flour and reduce heat to low.  Cook and stir until it forms a ball and pulls away from the pan.  Remove from heat and transfer to a large bowl.  Beat in eggs, one at a time, beating well after each egg.

 
Spread in bottom and up the sides of an ungreased 9x13-inch pan.  Bake at 400° for 35 minutes.  Cool completely.

 
To make the filling: In a large bowl, combine cream cheese and milk and beat until smooth.  Add pudding mix and beat until thickened.  Spread over cooled shell.  Top with whipped topping, and drizzle chocolate syrup over the top.

I'm joining in at Inspire Me Tuesday.

Monday, July 1, 2013

Happy birthday, Mom!

Today is my mom's 75th birthday.  Three-quarters of a century. She's seen some changes in her lifetime!  She's been married for 57 1/2 of those years.  She had four children by the age of 24! She has 8 grandchildren and 6 great-grandchildren (I hope I'm counting right!)


Moms and daughters seem to have up 'n down relationships.  When we are young we think our dads can hang the moon.  The moms, who have been taking care of the home, the children, the homework, you-name-it, get to play second fiddle.  But as young girls turn into women  our eyes begin to open and we begin to truly appreciate all our mothers did for us, we begin to see how strong our moms are.  Of course, when we have children of our own, it really sinks in and we finally understand the depth of a mother's feelings for her child.


I know (especially in my teenage years) I've crushed my mom's heart a time or two, hurt her feelings.  Not intentionally, just asserting my independence or lack of patience over something stupid. As a mother to a daughter I've experienced the same thing, payback is definately a bitch! But, mom loves me anyway!

Growing up I always felt I had more in common with my dad.  He's a drag racer, lives for cars and I've followed in his footsteps every step of the way. But I have a lot in common with mom, too.  We both love to read, especially murder/mysteries. She (along with her mom) taught me how to cook, bake, sew, all activities that I enjoy to this day. She's always up for a day trip to San Francisco, a drive to a tea room, hitting some antique shops. Looking through older eyes I can see that I've always been a combination of the two.


She's set an excellent example of sticking to your morals, sticking to your commitments,  being a compassionate person, a good wife, mother and grandmother. She's always doing for others, whether it be baking them a treat or a gift from her sewing room.

To quote Abraham Lincoln, "All that I am or ever hope to be, I owe to my angel Mother".

Happy birthday, Mom!  I love you!

I'm linking up to Inspire me Tuesday, I can't think of anyone or anything who inspires me more than my mom! 

Sunday, May 19, 2013

Birdhouses and a Birthday!

Our oldest granddaughter turns 8 on May 25 (where has the time gone?) She had a birthday party with her friends today.It was held at a ceramics shop, the kids got to pick a piece to paint.  It was a very fun, no-fuss birthday party!
 
 Her request to her Nana was to make some cake pops. Now I'm not a big fan of cake pops, they are much too sweet for me. However, a Nana always tries to please so I set out to fulfill her wish!
 
I wanted to do something different than just a plain cake pop. We must keep Nana entertained, and not bored, you see! While searching for ideas online I ran across the cutest truffle wrappers and knew they would be perfect for cake balls (cake pops without the sticks!) With the truffle wrappers the cake balls look like flowers. I found an inspiration picture of a garden-themed party with painted birdhouses. My mind went into high gear. It just so happened I had a few unpainted birdhouses in my closet (you can buy them at any hobby store) and lots of material and ribbon scraps. So, with scissors, glue and a little paint, I sat down and decorated a bird house! It became the centerpiece of the cake ball plate and my color theme.


I enjoy making sugar cookies (and my family loves eating them!) My decorating skills improve with each batch I make but they are no where near the beauty you can find at various cookie blogs. I tend to stick to cookie cutters with not much detail because I don't trust my piping skills yet. For favors I made birdhouse cookies, using a mini heart cookie cutter to add more whimsy.


I played with a new-to-me technique; making royal icing transfers of birds. It was easy to do and produced a more uniform bird than if I had tried to pipe a bird on each cookie. To do this I colored the icing and placed in a decorating bag. I found a clip art that I liked so I made a few copies. I then taped some waxed paper to my countertop, placed the clip art under the waxed paper and, using the picture as a guide, piped the birds. I let them dry overnight. They easily pop off the waxed paper. They can be stored for a long time, I put my extras in a mini canning jar. Anytime you have extra frosting you can make flowers, balloons, birds, any image you want, for future useage.


To use the transfers, I piped and flooded the cookies and, using tweezers, placed the transfer on the wet cookie. Once the cookie was dry, I used a food-safe marker to make the eyes and a little dark yellow icing to make the beak. I will definately be using more royal icing transfers in the future!


My granddaughter was pleased with her Nana's efforts and I got a big hug. She asked to keep the birdhouse for her bedroom. Now her little sister wants one, too! It just so happens I have another birdhouse in the closet, and more fabric and ribbon...

Please join me at Metamorphosis Monday!
 photo 100_3353aaabbbb144copy_zps0998a8b5.jpg