Tuesday, January 30, 2018

Sprinkle Cake (and an Anniversary!)

Today is my parents' 62nd wedding anniversary. That's quite an accomplishment in today's "throw away" society.  Like all marriages, they have had their share of ups and downs, but they've stayed committed. They raised four children, and have seven grandchildren and nine (so far!) great-grandchildren. Though they have some health issues they are still enjoying life and their family.

I usually take dinner to my parents on Sundays.  Dad has a major sweet tooth and his favorite cake is a plain white cake.  I wanted to make them a special dessert so decided to bake them a cake. I've seen so many sprinkle cakes on Instagram lately, I knew I had to make Dad's white cake a little extra-special. He loved it!


Any white cake can be used to make a sprinkle cake, it's just a matter of adding sprinkles to the batter before baking.  Heck, just use a boxed mix and throw some sprinkles in!  It's just a fun addition to a cake. You want to make sure you get the sprinkles called jimmies as the color in those sprinkles won't bleed during baking and turn your cake batter a muted color.  With "jimmies" you get bright spots of colors all throughout the cake.  Of course, kids love anything with sprinkles and my grandson enjoyed this, too!


I had big plans of doing some decorative piping on the cake so used a crusting buttercream. Time got away from me and I ended up pretty much just slathering the frosting on!  An all-butter frosting can also be used, but it doesn't hold it's shape as well as a frosting with some shortening in it.

Sprinkle Cake

Cake:
4 cups sifted cake flour
3/4 teaspoon baking powder
3/4 teaspoon baking soda
1 teaspoon salt
1 1/2 cups unsalted butter, room temperature
1 3/4 cups granulated sugar
4 large eggs, room temperature
3 teaspoons vanilla extract
1 1/2 cups buttermilk, room temperature
2 large egg whites, room temperature
3/4 cup sprinkles
 
Frosting:
1/2 cup butter, room temperature
1/2 cup shortening
8 cups powdered sugar
2 teaspoons vanilla extract
1/2 cup to 3/4 cup milk
Pinch salt
 
Preheat oven to 350F and prep 3 9-inch round baking pans by greasing the bottom and sides (I used baking spray).
 
In a large bowl, whisk 4 cups flour, 3/4 teaspoon baking powder, 3/4 teaspoon baking soda and 1 teaspoon salt; set aside.
 
Using a handheld electric mixer or a stand mixer fitted with the paddle attachment, beat the 1 1/2 cups butter on medium-high speed until smooth, light and creamy, about 2 minutes.
 
Add 1 3/4 cups sugar and beat on medium-high speed for another 5-7 minutes until very creamy (almost like whipped cream - you cannot see grains of sugar anymore), stopping frequently to scrape down the sides of the mixing bowl.
 
Add the 4 eggs, one at a time, until each one is well incorporated. Then add the 3 teaspoons of vanilla.
 
Switch to low speed and add a third of your flour mixture. Add half the buttermilk. Add another third of  the flour,  the last of the buttermilk, then finally the last third of the flour. Make sure each addition is mixed just until incorporated before the next one is added (do not over mix). You will notice the batter will be thick but still smooth and creamy.
 
In a separate mixing bowl, beat the 2 egg whites  until thick and foamy.  Gently fold into your batter. Then gently fold in the 3/4 cup sprinkles.
 
Transfer your batter into the prepared pans and bake for 25-30 minutes, or until a toothpick inserted in the middle of the cake comes out clean.
 
Cool on wire racks for 10 minutes, remove from pans and let cool completely before frosting.
 
Trim the tops of your cakes if they are uneven, using a serrated knife. The important thing is all three cakes are of equal height.
 
For the frosting, place room temperature butter and shortening in a large mixing bowl.  Add powdered sugar, vanilla extract and 1/2 cup milk. Turn mixer on low and mix until all ingredients are incorporated.  Turn mixer up to medium-high and mix for 2-4 minutes, adding more milk, if necessary, to reach desired consistency. Add food color, if desired.
 
Take one cake and place on a platter or cake turntable, smooth side down (trimmed side up). Evenly cover the top with frosting. Repeat with the 2nd and 3rd layers. For your 3rd layer, remember to place it smooth side up (trimmed side down) so that you'll have an even top.
 
Finish the cake by also covering the sides of your cake with a thin layer of frosting.  Refrigerate for 30 minutes to set the frosting, then cover the sides with the remaining frosting.  To help even out the frosting on top and the sides, use a bench scraper and gently scrape away excess frosting.
 
Decorate with sprinkles as desired.

Monday, January 22, 2018

Apple Cider (Baked) Donuts

The Food Network Channel has a new cooking show called Baking in Vermont. The subject of the show is Gesine Prado.  She and her husband live in rural Vermont and she runs a home-based baking school.  She is also the sister of the actress, Sandra Bullock.  I'm really liking the show, have earmarked many things that I want to bake. I like when the network has shows like this, where a person can learn new techniques.  I also find it interesting to see how things are done in Vermont.  They have food items and traditions that are totally foreign to this California girl!

On a recent show, she had an apple cider pressing gathering.  She recruited friends to press the apples and she made them breakfast.  One of the items were this baked donuts. After seeing the show I immediately went to Amazon and ordered some donut pans.  I am so easily influenced when it comes to baking pans!

I finally got around to making these.  They were quite yummy, especially when they were warm. They were very easy to make, I managed to make these and entertain my 3-year old grandson at the same time!


The recipe calls for the batter to be piped in one pan with another pan placed on top.  On the show she indicated that this was to get a round shape on both sides of the donut.  Well, in all honesty, mine were still flat on top! Maybe I should have added more batter?  It's not that big of a deal to me that I didn't have a fully-round donut so I instantly gave my two extra pans to my daughter-in-love!


I couldn't find any apple cider concentrate locally so bought this online.  It reminds me of molasses, so thick and the flavor is so concentrated. I think it definitely enhanced the flavor of these donuts.  I'm looking for recipes where I can use this again, it's so good!


Apple Cider (Baked) Donuts

1 1/2 cups all-purpose flour
1 1/2 teaspoons baking powder
1 teaspoon salt
1 teaspoon cinnamon
1/4 teaspoon nutmeg
Zest of 1 lemon
1/3 cup apple cider concentrate (for more depth of flavor) or apple cider
1/4 cup buttermilk
1 teaspoon vanilla
1 stick (4 ounces) unsalted butter, at room temperature
1/2 cup brown sugar
1/2 cup granulated sugar
2 large eggs, at room temperature

For dipping:
1 stick (4 ounces) unsalted butter, melted
1 cup granulated sugar mixed with 1 teaspoon cinnamon

Special equipment: four 6-cavity donut pans (see note above)

Preheat the oven to 350 degrees F. Spray four 6-cavity donut pans with nonstick baking spray.

In a large mixing bowl, combine the flour, baking powder, salt, cinnamon, nutmeg, and lemon zest. Whisk for 30 seconds to distribute the leavening.

In a liquid measure cup, combine the cider, buttermilk and vanilla.

In the bowl of a stand mixer fitted with the paddle attachment, combine the butter, brown sugar and granulated sugar. Mix on high until light and fluffy, 3 to 4 minutes. Scrape down the bottom and sides of the bowl.

Add the eggs, one at a time, mixing well between each addition. Scrape the bottom and sides of the bowl.

With the mixer on low, add one-third of the flour mixture and then half of the cider mixture. Continue alternating between the two until the batter is just combined. Remove the bowl from the stand mixer and, using a large rubber spatula, fold the batter a few times to make sure the ingredients are well distributed.

Transfer the batter to a piping bag or a large zip-close bag with a corner snipped off, and pipe into two of the donut pans.

Top each pan with a second, inverted pan and use clips to hold them in place. (Some pans come with clips; otherwise, use metal hardware or paper clips.)

Bake until the cake just springs back when gently touched, 15 to 20 minutes.

Turn the donuts out onto a cooling rack; immediately brush with melted butter, then dip in the cinnamon sugar.

Monday, January 8, 2018

Meyer Lemon Danish Braid

A friend recently brought in to my office a big box of Meyer lemons from one of her trees. We divided them up and I've been using them ever since. Oh, they are so good! My granddaughter loves scones with lemon curd and strawberry jam.  We recently had a two-person tea party and I made lemon curd for us. With leftover lemon curd in the fridge, I went searching for recipes and ran across this Danish braid on Instagram, of all places! (On a side note, I love the internet for the ability of finding new things but it has to cut down on cookbook sales.  I've not bought a new book in ages!) In addition to lemon curd, the braid has a cream cheese filling. What's not to like about that?


My favorite way to make breakfast yeast breads is to make the dough the night before and let it sit in the fridge overnight. This bread was easy to put together, my stand mixer did most of the work while I concentrated on making dinner. The hardest part was the braiding.  I need practice as my braiding kinda fell apart!  Oh, well, it still tasted great even though it could have looked prettier!


This was an easy and delicious breakfast treat.  My Hubbers had three pieces, which is unusual for him. My next-door neighbors loved it, too. Any kind of jam would work as a substitute for the lemon curd. This bread will be made again and again!

Meyer Lemon Danish Bread

Sponge:
6 tablespoons milk
1 teaspoon sugar
1 package yeast
2 tablespoons flour

Dough:
1/4 cup sugar
4 oz. cream cheese, softened
3 tablespoons unsalted butter, softened
3/4 teaspoon salt
1 teaspoon vanilla extract
1 large egg, at room temperature
2 1/4 cups flour, divided

Filling:
3 oz. cream cheese, softened
2 tablespoons sugar
Pinch of salt
1 teaspoon Meyer lemon juice
1/2 teaspoon vanilla extract
1/3 cup lemon curd (see recipe here)

Glaze:
1/2 cup powdered sugar
Pinch of salt
1/2 teaspoon Meyer lemon zest
1 tablespoon plus 2 teaspoons Meyer lemon juice

For the sponge, heat milk in a microwave-safe measuring cup for 45 seconds to 1 minute, until very warm (120-130°F). Whisk together warm milk, sugar, yeast, and flour in a medium bowl; cover loosely with plastic wrap and let stand 15 minutes.
 
For the dough, combine sugar, cream cheese, butter, salt, vanilla, egg, and sponge in a large mixer bowl; beat at medium speed for 1 minute until combined. Add 2 cups  flour and mix in at low speed until a soft dough forms, about 2 to 3 minutes. Switch out the flat beater for a dough hook, and knead dough for 4 minutes until smooth and elastic, adding remaining 1/4 cup of flour 1 tablespoon at a time to prevent dough from sticking. The dough is ready when it feels tacky but doesn't stick to your fingers.
 
Place dough in a large bowl coated with nonstick spray and cover with plastic. Let the dough rise in a warm place until doubled in size, about 50 to 60 minutes. To check if dough has doubled, lightly flour two fingers and press them down into center of dough. If indentations remain, dough has risen enough.
 
While the dough rises, prepare the filling. Combine cream cheese, sugar, salt, Meyer lemon juice, and vanilla in a food processor and process until smooth.
 
Line a large rimmed baking sheet with parchment paper and dust lightly with flour. Gently punch down dough and roll out into a 12 x 15-inch rectangle on prepared baking sheet. Use an offset spatula to spread cream cheese mixture down the center of the dough, leaving a 4-inch border on each side and a 1-inch border at the top and bottom. Spread Meyer lemon curd over the cream cheese filling. Using a sharp knife or kitchen shears, cut 15 1-inch strips on both sides of dough (be careful not to cut parchment paper).
 
Remove the four corner strips and fold top border down over filling. Work from top to bottom and fold strips over filling, alternating strips diagonally (begin by folding over the top left strip, then fold the top right strip, then a left strip, and so on). When all the strips are folded over filling, fold up the bottom border and press to seal. Cover braid loosely with plastic and let rise 25 minutes. (Prepare ahead: After braid rests, cover and refrigerate overnight. Bring to room temperature before baking).
 
Preheat oven to 375°F. Bake braid until golden, about 25 minutes. Let cool on a wire rack for 15 minutes before glazing. For the glaze, whisk together powdered sugar, Meyer lemon zest, and juice in a small bowl. Drizzle glaze over braid and let set before serving.
 
Recipe adapted from:  www.tutti-dolci.com

Thursday, January 4, 2018

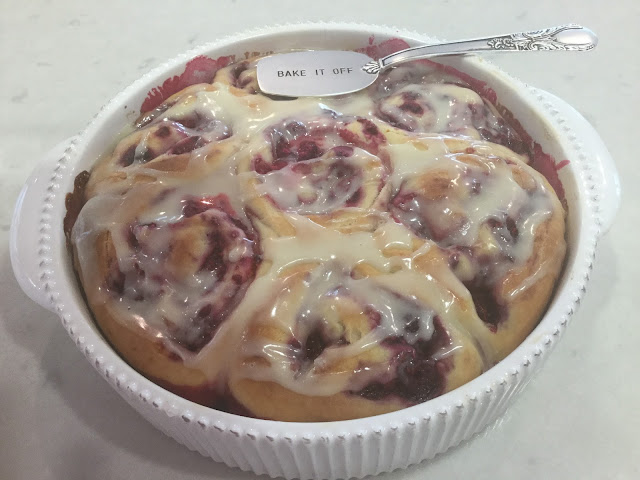
Raspberry Orange Rolls

My son and daughter-in-love got me a new baking pan for Christmas. (If my son is anything like his father, he probably didn't know what he gifted me until I opened the package!) We all know I love cute baking pans and this pan is just adorable.  It came with a small spatula that says "bake it off". 


Well, of course getting this pan meant I had to  make some rolls! I had just made cinnamon rolls a few days earlier so wanted to do something different. I love, love, love any kind of berry so knew I had to try these raspberry rolls.  The addition of orange zest in the raspberry filling was just the right flavor combination.  I shared a pan of these rolls with my next-door neighbors and they got rave reviews.


I used frozen raspberries for two reasons.  One, it's not berry season and the ones in the produce section just didn't appeal to me.  Secondly, the frozen raspberries seem to hold their shape a little better, they don't get as mushy when baked. Either will work fine!


As with most breakfast yeast dough that I make, I assembled these rolls the night before and baked them the next morning. I prepared the dough and placed the sliced rolls in the pans. I wrapped them tightly with plastic wrap and placed in the refrigerator overnight.  In the morning I set out the dough to warm and rise until doubled in size, about 30-45 minutes before baking. This method works so well for me, I don't have to get up at the crack of dawn to have fresh homemade rolls!

I make most of my yeast dough in my Kitchenaid mixer, taking advantage of letting the dough hook do all the kneading for me.  If you don't have a big mixer, these rolls are very easy to make by hand.  Just knead them until you have a smooth dough that springs back when touched.


Raspberry Orange Rolls

Dough
1 cup lukewarm milk
1/4 cup  butter, melted
2 1/2 teaspoons active dry yeast
1 large egg
1/4 cup granulated sugar
1 teaspoon salt
3 1/2 cups all-purpose flour

Raspberry Filling
Zest of 1 orange
1/4 cup sugar
1 teaspoon cornstarch
10 ounces frozen raspberries

Glaze
1 cup confectioners sugar
2 tablespoons orange juice (or more to get good consistency)

For the dough, place lukewarm milk, melted butter, yeast, egg, sugar, and salt into the bowl of a stand mixer. Whisk until combined. Attach the dough hook, add the flour, and knead on low speed about 8 minutes, until smooth and elastic. (Alternatively, add flour and stir until the mixture begins to form a dough. Place the dough on a lightly floured surface and knead by hand until smooth and elastic, about 8 minutes).

Form the dough into a ball and place into a lightly greased bowl. Cover and allow the dough to rise in a warm environment until doubled in volume, about 1 hour.

On a lightly floured surface, roll out the dough into a 12 x 15-inch rectangle. Spread 2 tablespoons softened butter over dough.

For the filling, mix together the sugar and orange zest until fragrant ( I squish it together with my fingers). Mix in the cornstarch. Gently stir in the frozen raspberries.  Sprinkle raspberry mixture uniformly on the dough, leaving a 1-inch border around the edges. Starting lengthwise, roll the dough into a log shape. Trim off the ends and slice the roll into 12 evenly sized pieces. Place rolls into a buttered 9 x 13-inch pan. Cover and let rise until doubled, about 30-45 minutes.

Preheat oven to 375 degrees. Bake rolls for 20-25 minutes, or until golden brown.

To make the glaze, whisk together confectioners sugar and orange juice in a small bowl.  Add more orange juice, if necessary, to get a glaze consistency. Spread baked rolls with glaze using an off-set spatula while they are still warm.