Monday, May 8, 2017

No-Knead Crusty Bread


A few years back a cookbook came out called Artisan Bread in 5 Minutes a Day. I bought it and tried the bread, with great results.  It involved making a quick yeast dough by stirring the ingredients together, leaving it out on the counter for a few days, then refrigerating.  Whenever you wanted to make a loaf of bread, rolls, or pizza, you cut off a chunk of dough and baked (usually on a hot pizza stone). There was no kneading involved. It was great bread.  However, it made a lot of dough, and took up a lot of room in the fridge. If I was super busy and didn't make bread on a frequent basis, it would spoil.

As the bread was very good, I was intrigued when I saw recipes to make one loaf at a time in a Dutch Oven. This past weekend I decided to try it.  We were in our RV at the racetrack so I made sure to pack a 3.5 qt. Dutch Oven. I mixed the dough on Friday night, Saturday night I shaped it into a ball and baked it. It was one of the best breads I've ever eaten! It has a crusty and chewy texture to it, very similar to a loaf of sourdough bread. We devoured half the loaf with our tri tip dinner then I sliced the rest for toast in the morning.  It could not have been easier to make. I will make this bread again and again.


No-Knead Crusty Bread

3 cups all-purpose flour
1 3/4 teaspoon salt
1/2 teaspoon active dry yeast
1 1/2 cups water, room temperature

In a big bowl, mix the flour, salt and yeast together. Pour the water into the bowl and, using a spatula or wooden spoon, mix it until well incorporated.

Cover the bowl with plastic wrap and let it sit on your counter for 12 to 18 hours.

Preheat oven to 450 degrees.  Add your Dutch Oven pot to the oven as it's heating and heat it as well until it's at 450 degrees.

Remove the pot from the oven and remove the lid from it. If you want to make sure your bread doesn't stick to the pot you can sprinkle some flour or cornmeal on the bottom of the pot.

Flour your hands really well and also sprinkle a bit of flour over the dough. With your floured hands gently remove the dough from the bowl and roughly shape it into a ball.  Take the ball of dough and drop it into the pot.  Cover the pot with the lid and place it back in the oven.

Bake for 30 minutes with the lid on, after which remove the lid and bake for another 15 to 20 minutes until golden brown.

Remove the bread from the pot, it should fall out easily.  Let cool before slicing it.

Notes:

A small (3.5 qt.) Dutch Oven is better so that the bread rises upwards.  Larger Dutch Ovens will cause the bread to spread out over the surface of the pot.

If the dough mixture is too dry, add a bit more water.  The dough should be sticky.

To add other ingredients to the bread such as dried fruit, seeds, herbs or cheeses, add them when mixing in all the ingredients.
 
After sitting for 12 to 18 hours, the dough is very spongy and sticky, very similar to a sourdough starter.
 

Friday, May 5, 2017

Creamy Lemon Risotto with Asparagus

This recipe comes from the Williams Sonoma Taste Blog.  My Hubbers loves risotto, we both love asparagus and lemon, so it quickly went to the top of the "things I want to make" list.


It's a great risotto, one I will make again. I'm hoping the next time I make it things will go smoother.  If it could go wrong, making this dish, it did! We are leaving for the race track in the morning.  Our motorhome and my race car are parked in front of our house. I am taking items from home and transferring them to the RV, in our above-normal 90-plus degree weather! I had to pick my granddaughter up from school, feed her a snack, and take her to gymnastics. In the meantime, a floor installer stopped by to measure the RV as we are going to replace some of the carpet with laminate wood flooring. This was probably not the night to try a new recipe!  I didn't have shallots, though I could swear I bought some (did they stay in the grocery cart?)  I ended up adding a little garlic and onion salt to compensate. When it came time to put the wine in, I accidentally put the lemon juice in instead, even though I hadn't gotten the seeds out of the juice yet. So, the wine got added in later! I didn't have as much cream as the recipe called for. You would think I was a beginner in the kitchen!  But, it's obviously a very forgiving recipe; it has a nice lemon flavor and the cream gives the risotto an extra creaminess. It's a light and fresh-tasting spring risotto.


Creamy Lemon Risotto with Asparagus

1 lb. asparagus, ends trimmed
1 tablespoon unsalted butter
1 tablespoon extra-virgin olive oil
1 shallot, finely chopped
3 fresh thyme sprigs
2 cups Arborio rice
Fine sea salt and freshly ground black pepper
1/4 cup dry white wine
6 cups chicken broth, heated to a simmer
2 teaspoons finely grated lemon zest
1/2 cup heavy cream
1/2 cup grated Parmesan cheese
2 tablespoons fresh lemon juice
2 tablespoons minced fresh flat-leaf parsley

In a microwave-safe bowl, combine the asparagus and 2 tablespoons water. Cover loosely with plastic wrap and microwave on high until the spears are crisp-tender, about 2 minutes. Alternatively, place the asparagus in a steamer basket and set over a saucepan of simmering water. Cover and steam until the spears are tender-crisp, 3 to 4 minutes. Cut into 1-inch pieces and set aside.

In a large, heavy saute´pan over medium heat, melt the butter with the olive oil. When the butter has melted, add the shallot and cook, stirring often, until starting to soften, about 5 minutes. Stir in the thyme sprigs and cook until the shallot is softened and translucent, about 3 minutes longer.

Add the rice and 1 teaspoon salt to the pan, stirring to coat the grains of rice with the butter and oil.  Raise the heat to medium-high, pour in the wine and stir until absorbed. Reduce the heat to medium and add a ladleful of hot broth.  Cook, stirring often, until the broth is absorbed. Reduce the heat to medium-low if necessary to maintain a gentle simmer. Continue to cook the risotto, adding the broth a ladleful at a time and stirring until it is absorbed, until the rice is tender but still pleasantly chewy, about 20 minutes.

Stir in the reserved asparagus, lemon zest, cream, and cheese. Then stir in the lemon juice and a final ladleful of broth to achieve a creamy texture. The risotto should not be too stiff or too runny; it should mound softly on a spoon.  Sprinkle with the parsley, season with pepper and serve immediately.

Making risotto isn't difficult but it does require some patience as you continually add broth, stir until it's absorbed, and add some more until you get a creamy mixture.


Tuesday, May 2, 2017

Embroidered Lavender Napkins

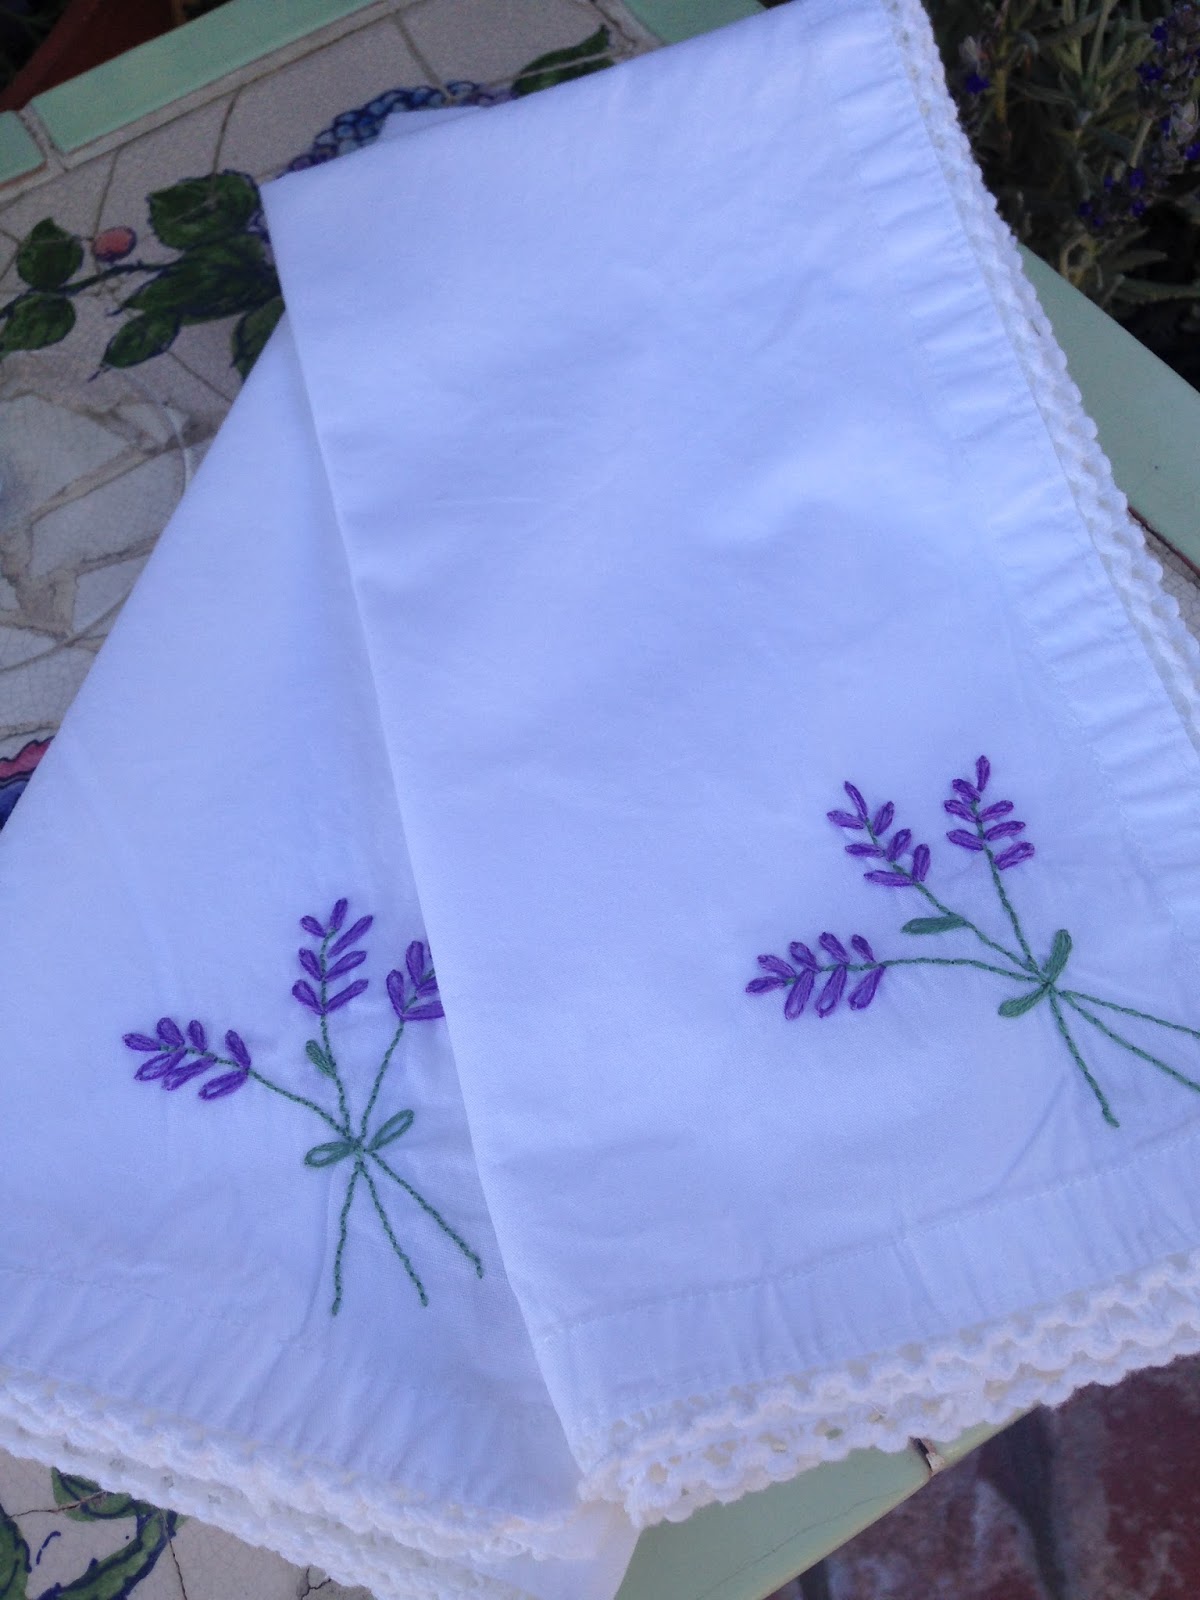
Whenever I see plain white napkins on sale I usually buy a few.  They make a great medium for an upgraded linen.  A little ric rac, lace, buttons, or embroidery and you have a beautiful, and inexpensive, table linen. They make great hostess, wedding shower, or wedding gifts. I think cloth napkins add so much to a table setting, it makes the dinner feel a little more special. I've been gathering items to do a lavender table setting (still looking for the perfect plates!) so wanted to do some embroidered napkins.  I found a picture I liked, copied it and traced on the napkin.  I started embroidering them on Super Bowl Sunday.  Tax season got in the way and they sat in my craft room for a few months.  Now that tax season is over, I whipped six of them out in a matter of hours! Super easy and very pretty!


I have an Amazon credit card and use it for everything; groceries, clothing, travel, etc. I log online every few weeks and pay the charges so I don't incur interest (heaven forbid an accountant pay finance charges!)  The bonus for doing this is the Amazon points I accumulate.  I use these points to buy items that I wouldn't ordinarily spend money on, they are kind of my "splurge" points. With some of my points I bought this light box.  The rendering you want to trace is placed on the box, the light backlights it making it easy to trace the design onto fabric or paper.  It made tracing my design on these napkins so easy!

Friday, April 28, 2017

Black & White Angel Food Cake

I grew up with a frugal family, both money-wise and food-wise.  The apple doesn't fall too far from the tree, so the saying goes, and it seems I've inherited many of those same traits.  My Grandma used to always caution me about not wasting food.  When she was teaching me to can fruit, she was always instructing me on how to peel the fruit so that only the peel was removed, not any of the valuable fruit.  If she had too-ripe fruit she would find a use for them, they wouldn't get thrown away.

Over the years I've developed my own set of food-saving habits, one of which is for egg whites.  Whenever I have a recipe where I need more egg yolks than whites, I don't throw the whites away.  They go into a container in my freezer.  Usually, they eventually go into angel food cakes.  The pink peppercorn ice cream I made recently calls for all egg yolks. This time the egg whites went into the fridge as I knew I would make an angel food cake in the next few days. I've been wanting to make this recipe, from Ina Garten, for a while now. It has shaved chocolate in the batter instead of the traditional plain batter. I had just the occasion for making the cake, our monthly book club meeting was coming up.  I contacted our hostess and asked if I could bring dessert.  This group has become my culinary "guinea pigs" and they are fun to experiment on.


We all enjoyed the cake.  Kim, our hostess, sliced some strawberries to serve alongside the cake.  Angel food cake, strawberries, chocolate ganache frosting...yum, yum! I never got a picture of the cake after cutting, but it's flecked with small bits of chocolate.

This angel food cake wasn't difficult but it does involve a lot of mixing bowls.  I love to bake and would probably bake more, if I had help with the clean-up!


Black & White Angel Food Cake

2 cups sifted superfine sugar **
1 1/3 cups sifted cake flour
1 1/2 cups egg whites at room temperature (10 to 12 eggs)
3/4 teaspoon kosher salt
1 1/2 teaspoons cream of tartar
1 teaspoon pure vanilla extract
1/2 cup coarsely grated semisweet chocolate (2 ounces)

For the glaze:
1/2 pound semisweet chocolate chips
3/4 cup plus 1 tablespoon heavy cream

Preheat the oven to 350 degrees.

Combine 1/2 cup of the sugar with the flour and sift them together 4 times. Set aside.

Place the egg whites, salt, and cream of tartar in the bowl of an electric mixer fitted with a whisk attachment and beat on high speed until the eggs form medium-firm peaks, about 1 minute. With the mixer on medium speed, add the remaining 1 1/2 cups sugar by sprinkling it over the beaten egg whites.  Beat on high speed for a few minutes, until thick and shiny. Add the vanilla and continue to whisk until very thick, about 1 more minute.  Scrape the beaten egg whites into a large bowl.  Sift one-fourth of the flour mixture over the egg whites and fold it very carefully into the batter with a rubber spatula. Continue adding the flour by fourths, sifting and folding until it's all incorporated. Fold in the grated chocolate.

Pour the batter into an ungreased 10-inch tube pan, smooth the top, and bake it for 35 to 45 minutes, until it springs back to the touch. Remove the cake from the oven and invert the pan on a cooling rack (or invert onto a bottle). When cool, run a thin, flexible knife around the cake to remove it from the pan.

For the chocolate glaze, place the chocolate chips and the heavy cream in a heat-proof bowl set over a pan of simmering water and stir until the chocolate melts. Pour the chocolate over the top of the cooled cake to cover the top completely and allow it to drizzle down the sides.  If you have chocolate glaze left over, you can serve it on the side with the cake.

** If you can't find superfine sugar, put granulated sugar into the food processor fitted with a steel blade and process it for 30 seconds.


The flour/sugar mixture has to be sifted four times.  I just went from bowl to bowl!

If your angel food cake pan doesn't have legs on it, just invert it onto a glass bottle.  It's important that the cake be inverted while cooling so it doesn't deflate.

Monday, April 24, 2017

Strawberry Pie with Pink Peppercorn Ice Cream

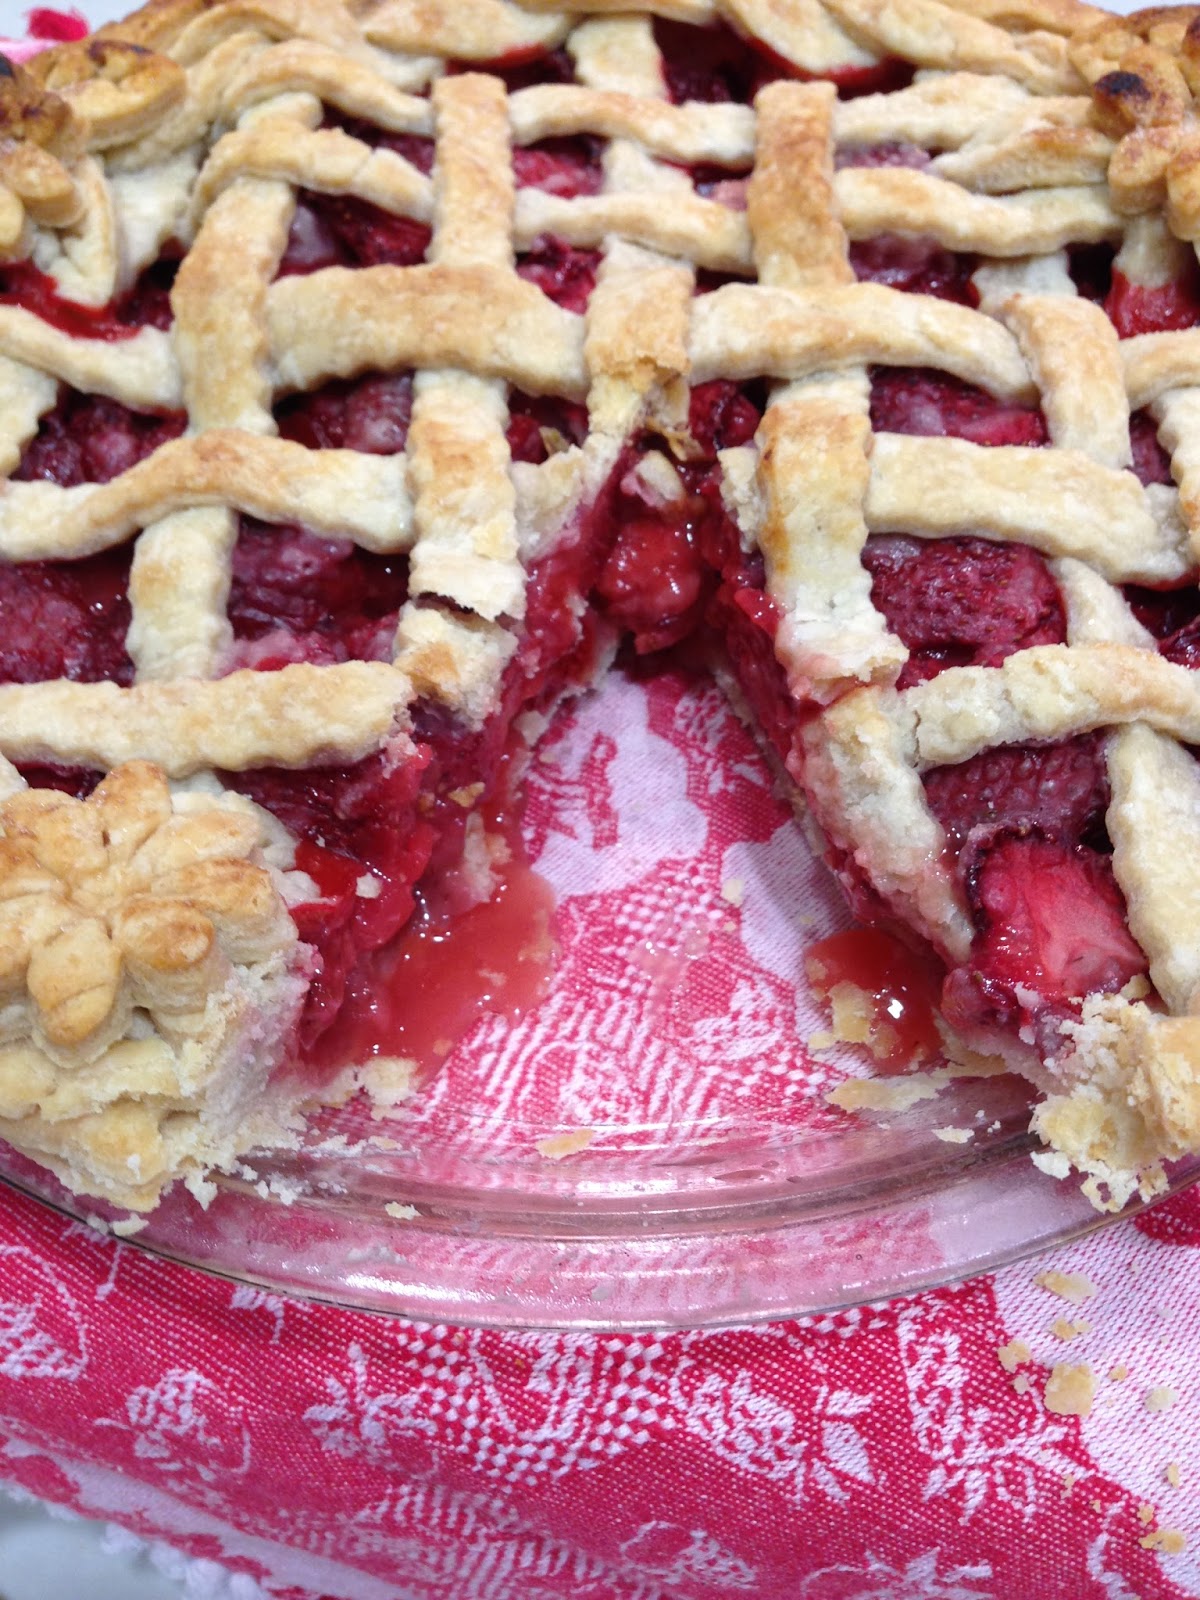
When my neighborhood strawberry patch opens up for the season I know that spring has officially arrived. It is literally a 5-minute drive to get fresh-from-the-field, just-picked strawberries. Oh, how I love them!  I made strawberry shortcake for Easter dinner. This past weekend I made 3 batches of strawberry jam and had enough berries leftover to make a pie. I've never made a baked strawberry pie, I've always made some form of refrigerated pie. I wanted to try something new so got out the pastry supplies and baked a pie! After dealing with numbers and clients for 3 1/2 months it felt so good to get back in the kitchen! I was so happy not to be at my desk and computer that I may have gotten a little carried away with decorating the pie; making a braided edge and flower cut-outs.


A few years back my husband and I enjoyed a strawberry-rhubarb crisp at a restaurant somewhere (I don't remember where!)  It was served with a pink peppercorn ice cream. I had never heard of such an ice cream, much less tasted anything like it.  The combination of a little spice with the sweetness of the fruit was a great combination. I remember coming home and replicating it a few nights later. I thought this ice cream would be great with the strawberry pie, in lieu of traditional vanilla ice cream.  Fruit pies can be very sweet, the slight hotness of the pepper tones that down some.


Strawberry Pie

Pastry for 2-crust pie (either homemade or store bought)
6 cups hulled and halved strawberries
1/4 to 1/2 cup sugar, depending on the sweetness of the berries
3 tablespoons flour

Heat oven to 375 degrees.  On a lightly floured surface, roll one round of dough to fit inside a 9-inch pie dish.

Combine strawberries, sugar and flour in a large bowl.  Pour in pastry-lined pie dish.

Roll out second round of dough and slice into 10 strips.  Create a lattice pattern on top of pie.  Crimp edges.  If desired, brush top and edges with a beaten egg and then sprinkle with about 1 tablespoon sugar.

Bake for 60 minutes, until filling is bubbly.  If crust is browning too quickly, cover with aluminum foil.


Though the pink peppercorns resemble a peppercorn both in looks and taste, they are actually the dried berry of a flowering bush. This ice cream isn't something that you would eat a bowl of after dinner but its spiciness and slight floral flavor adds a lot as a side to a sweet treat. In addition to being good with fruit pies and crisps, it's also good with a warm brownie and hot fudge sauce or molten chocolate dish. I usually add a little food coloring to the custard, if not the ice cream is more beige than pink!


Pink Peppercorn Ice Cream

2 cups whole milk
2 cups heavy whipping cream
1 cup sugar
1/4 cup pink peppercorns, crushed
7 large egg yolks

Bring milk, cream, sugar, and peppercorns to boil in a heavy large saucepan, stirring until the sugar dissolves.  Remove from heat; let stand at room temperature 1 hour for flavors to blend.

Bring milk mixture to a simmer. Whisk egg yolks in a large bowl to blend. Gradually whisk hot milk mixture into yolks.  Return mixture to pan and stir over medium heat until finger leaves a path on back of spoon when drawn across, about 3 minutes (do not boil). Strain custard into large bowl; cover. Refrigerate until cold, about 4 hours. (Can be made 1 day ahead. Keep refrigerated.)

Process custard in ice cream maker according to manufacturer's instructions.  Transfer to container; cover and freeze.  

Recipe source:  Bon Appetit September 2004

Friday, April 14, 2017

Happy (Hoppy!) Easter!

With the exception of a few extensions to finish up, I'm pretty much done with the upcoming tax filing deadline. I'm slowly starting to reclaim my life back.  The bedroom carpets were cleaned yesterday, the window cleaner comes next week, we have toilet paper in the house again.  Most importantly, I found the time to make my grandchildren's Easter bags. A few months back, a friend sent me a picture of some painted blocks, made to look like bunnies.  Immediately I thought the same idea would work for bags.  I glued bunny ears, twisted pipe cleaners, made a heart nose and a yarn pom pom tail.  I worked on them, off an on, for a few nights.  It was such a relief from dealing with numbers and stress! 


Easter dinner will be at our house so I will be reclaiming my kitchen again, too! I've not finalized the menu but my nearby strawberry patch has recently opened.  Strawberries will be on the dessert menu!

Happy Easter!

Monday, April 10, 2017

Berry-Ricotta Cake

I actually cooked dinner last night.  Except for a rotisserie chicken I bought the night the grandchildren came over, this was the first meal I prepared in over a week.  The hours of tax season 2017 have been long and I've not had a day off since Super Bowl Sunday.  My quilt project is gathering dust, I've barely got one row done on my newest cross stitch project.  We are down to two rolls of toilet paper in the house (Costco, here I come!)  The good news is there is only a week of tax season left and we are in pretty good shape at the office.  Soon I will be back to "putzing" at home again!

While cooking the lone dinner, I had the desire to bake something sweet.  I've been eyeing this recipe from Bon Appetit for a while now. The original recipe calls for raspberries. I didn't have any but I do have some frozen boysenberries left from last summer. The user reviews said any berry would work in this cake so I grabbed a cup of frozen berries and got to work.  It is such an easy cake to make, I mixed it while my pasta was cooking. The ricotta cheese makes this such a moist cake. My husband really enjoyed it, he ate two pieces! The rest got taken to the office and it was gone in a flash. As soon as raspberries are in season I will be making this cake again!


Berry-Ricotta Cake

1 1/2 cups all-purpose flour
1 cup sugar
2 teaspoons baking powder
3/4 teaspoon kosher salt
3 large eggs
1 1/2 cups ricotta
1/2 teaspoon vanilla extract
1/2 cup (1 stick) unsalted butter, melted
1 cup frozen boysenberries, blackberries, or raspberries, divided

Preheat oven to 350 degrees  Line a 9-inch diameter cake pan with parchment paper and lightly coat with nonstick spray. Whisk flour, sugar, baking powder, and salt in a large bowl.

Whisk eggs, ricotta, and vanilla in a medium bowl until smooth; fold into dry ingredients just until blended. Then fold in butter, followed by 3/4 cup berries, taking care not to crush the berries. Scrape batter into prepared pan and scatter remaining 1/4 cup berries over top.

Bake cake until golden brown and a tester inserted in the center comes out clean, 50-60 minutes. Let cool at least 20 minutes before unmolding.

Top with whipped cream, if desired.